Master Data
Master Data
Master Data serves as the primary data or primary reference used throughout the system. Therefore, before creating a document, transmittal, correspondence, or task, all basic categories or types must first be defined in the Master Data.
Document Category
Document Category is used to group documents based on certain categories.
Create Document Category
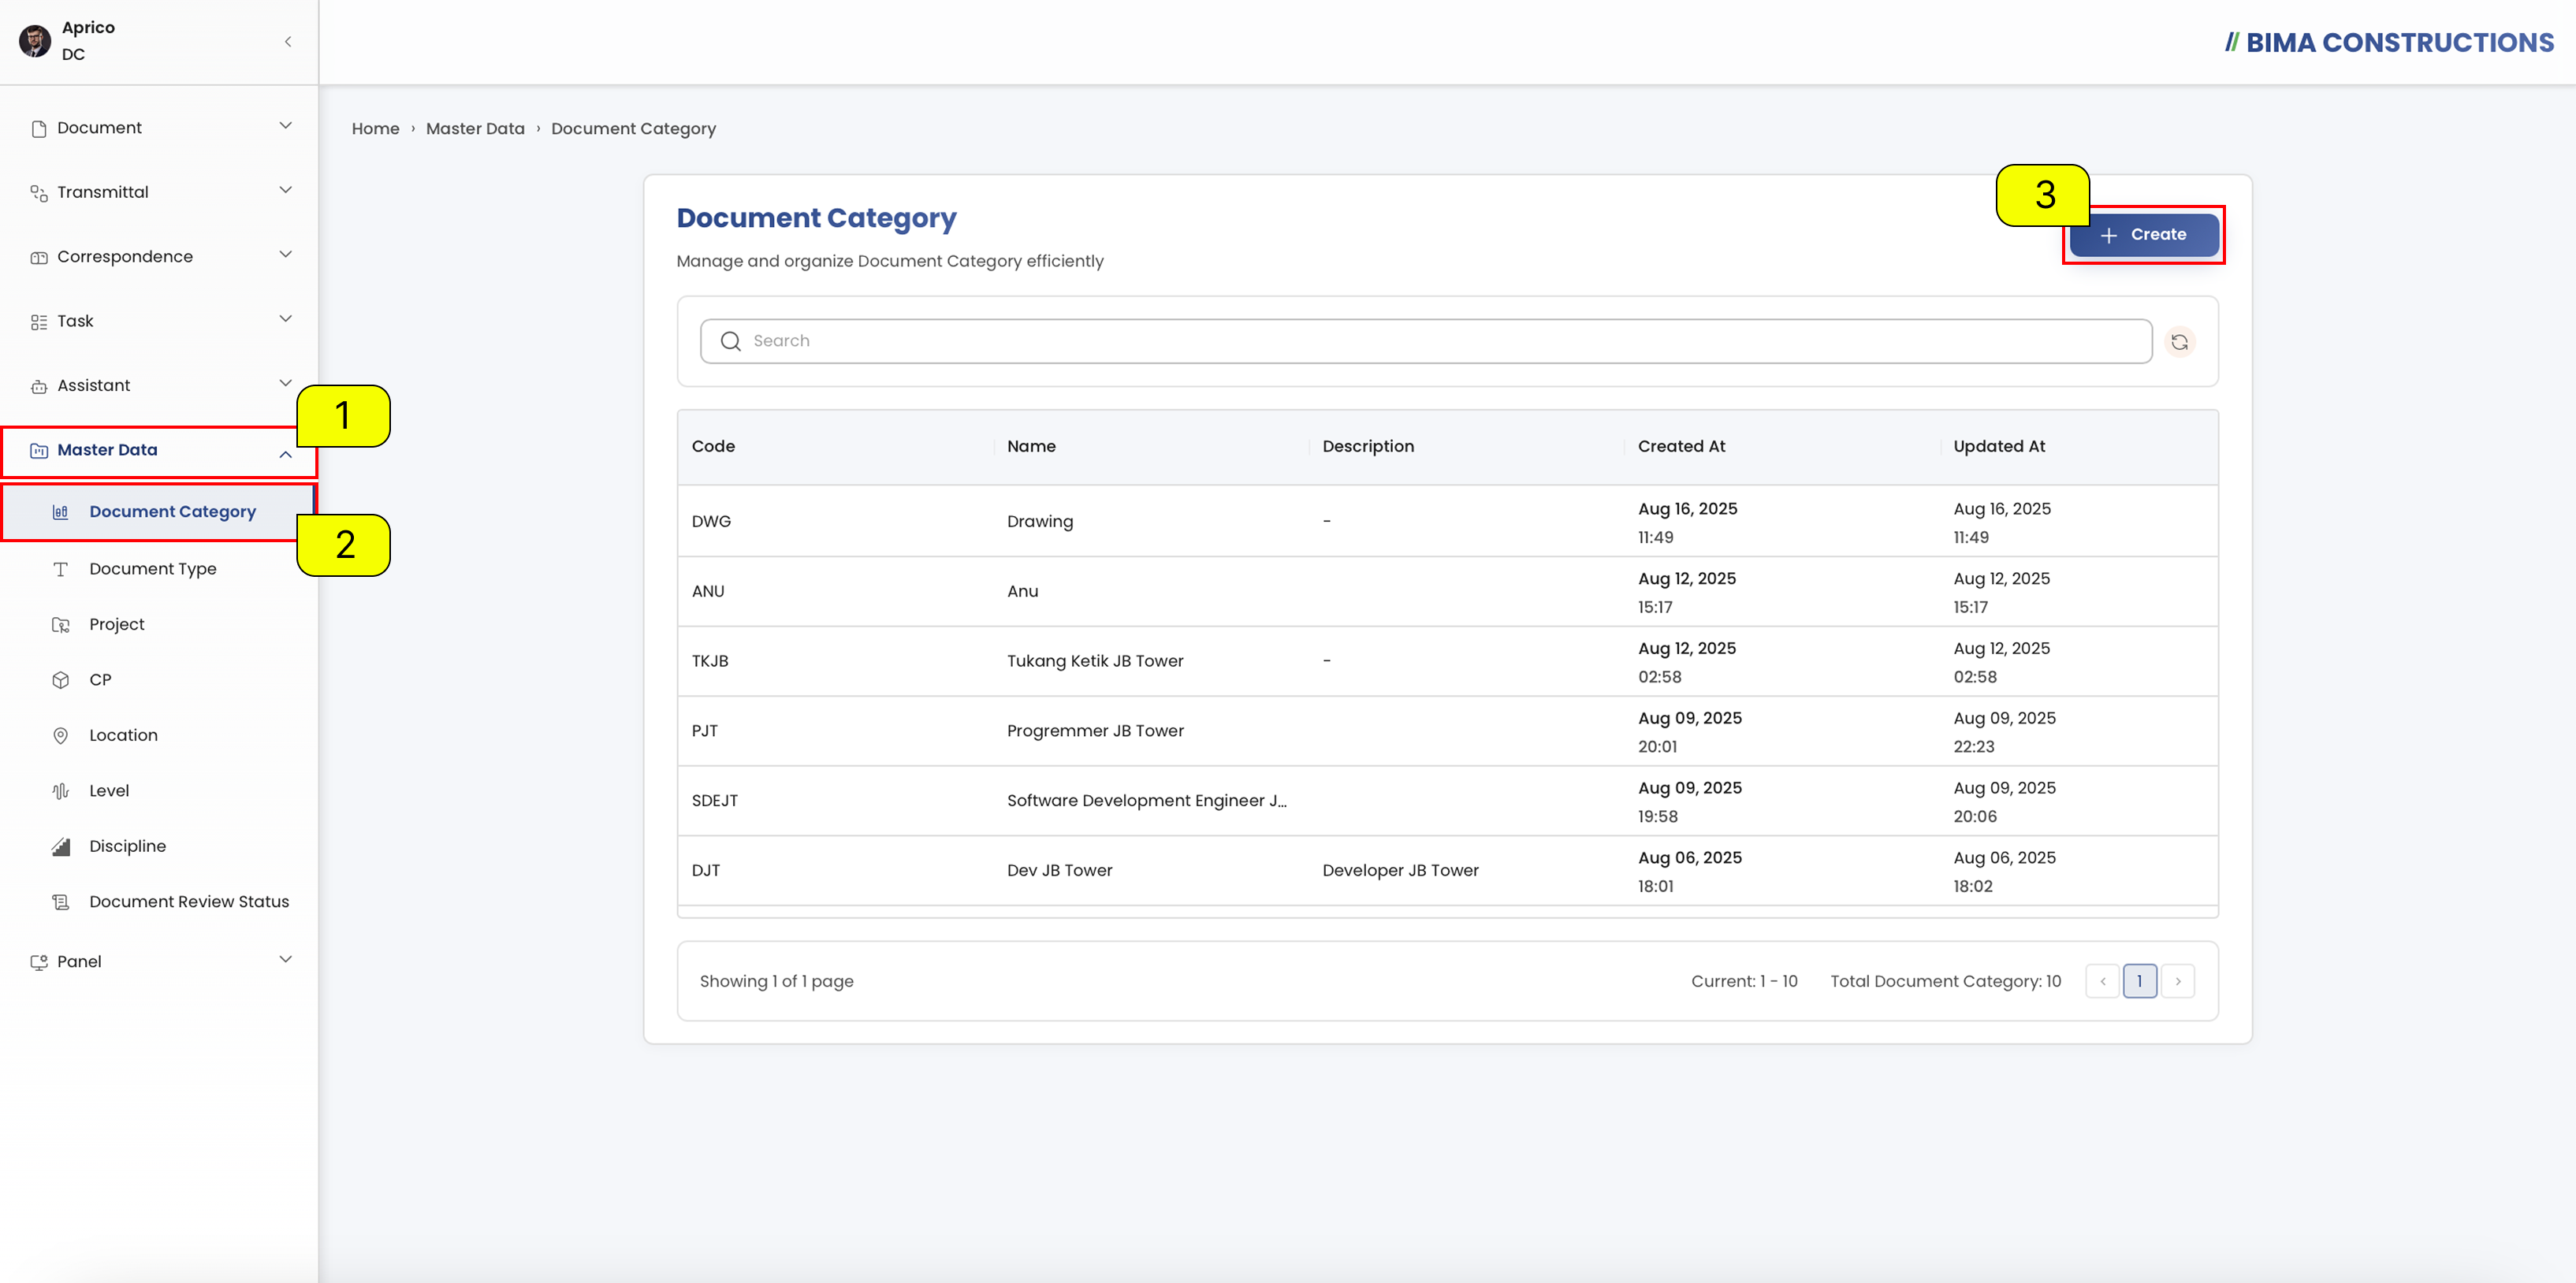
Open Document Category
- The Document Controller can click on the
Master Datamenu button to expand its submenu.- The Document Controller can select the
Document Categorymenu to view all existing document categories.- The Document Controller can click on the
Createbutton to add a new document category.Fill Document Category Form
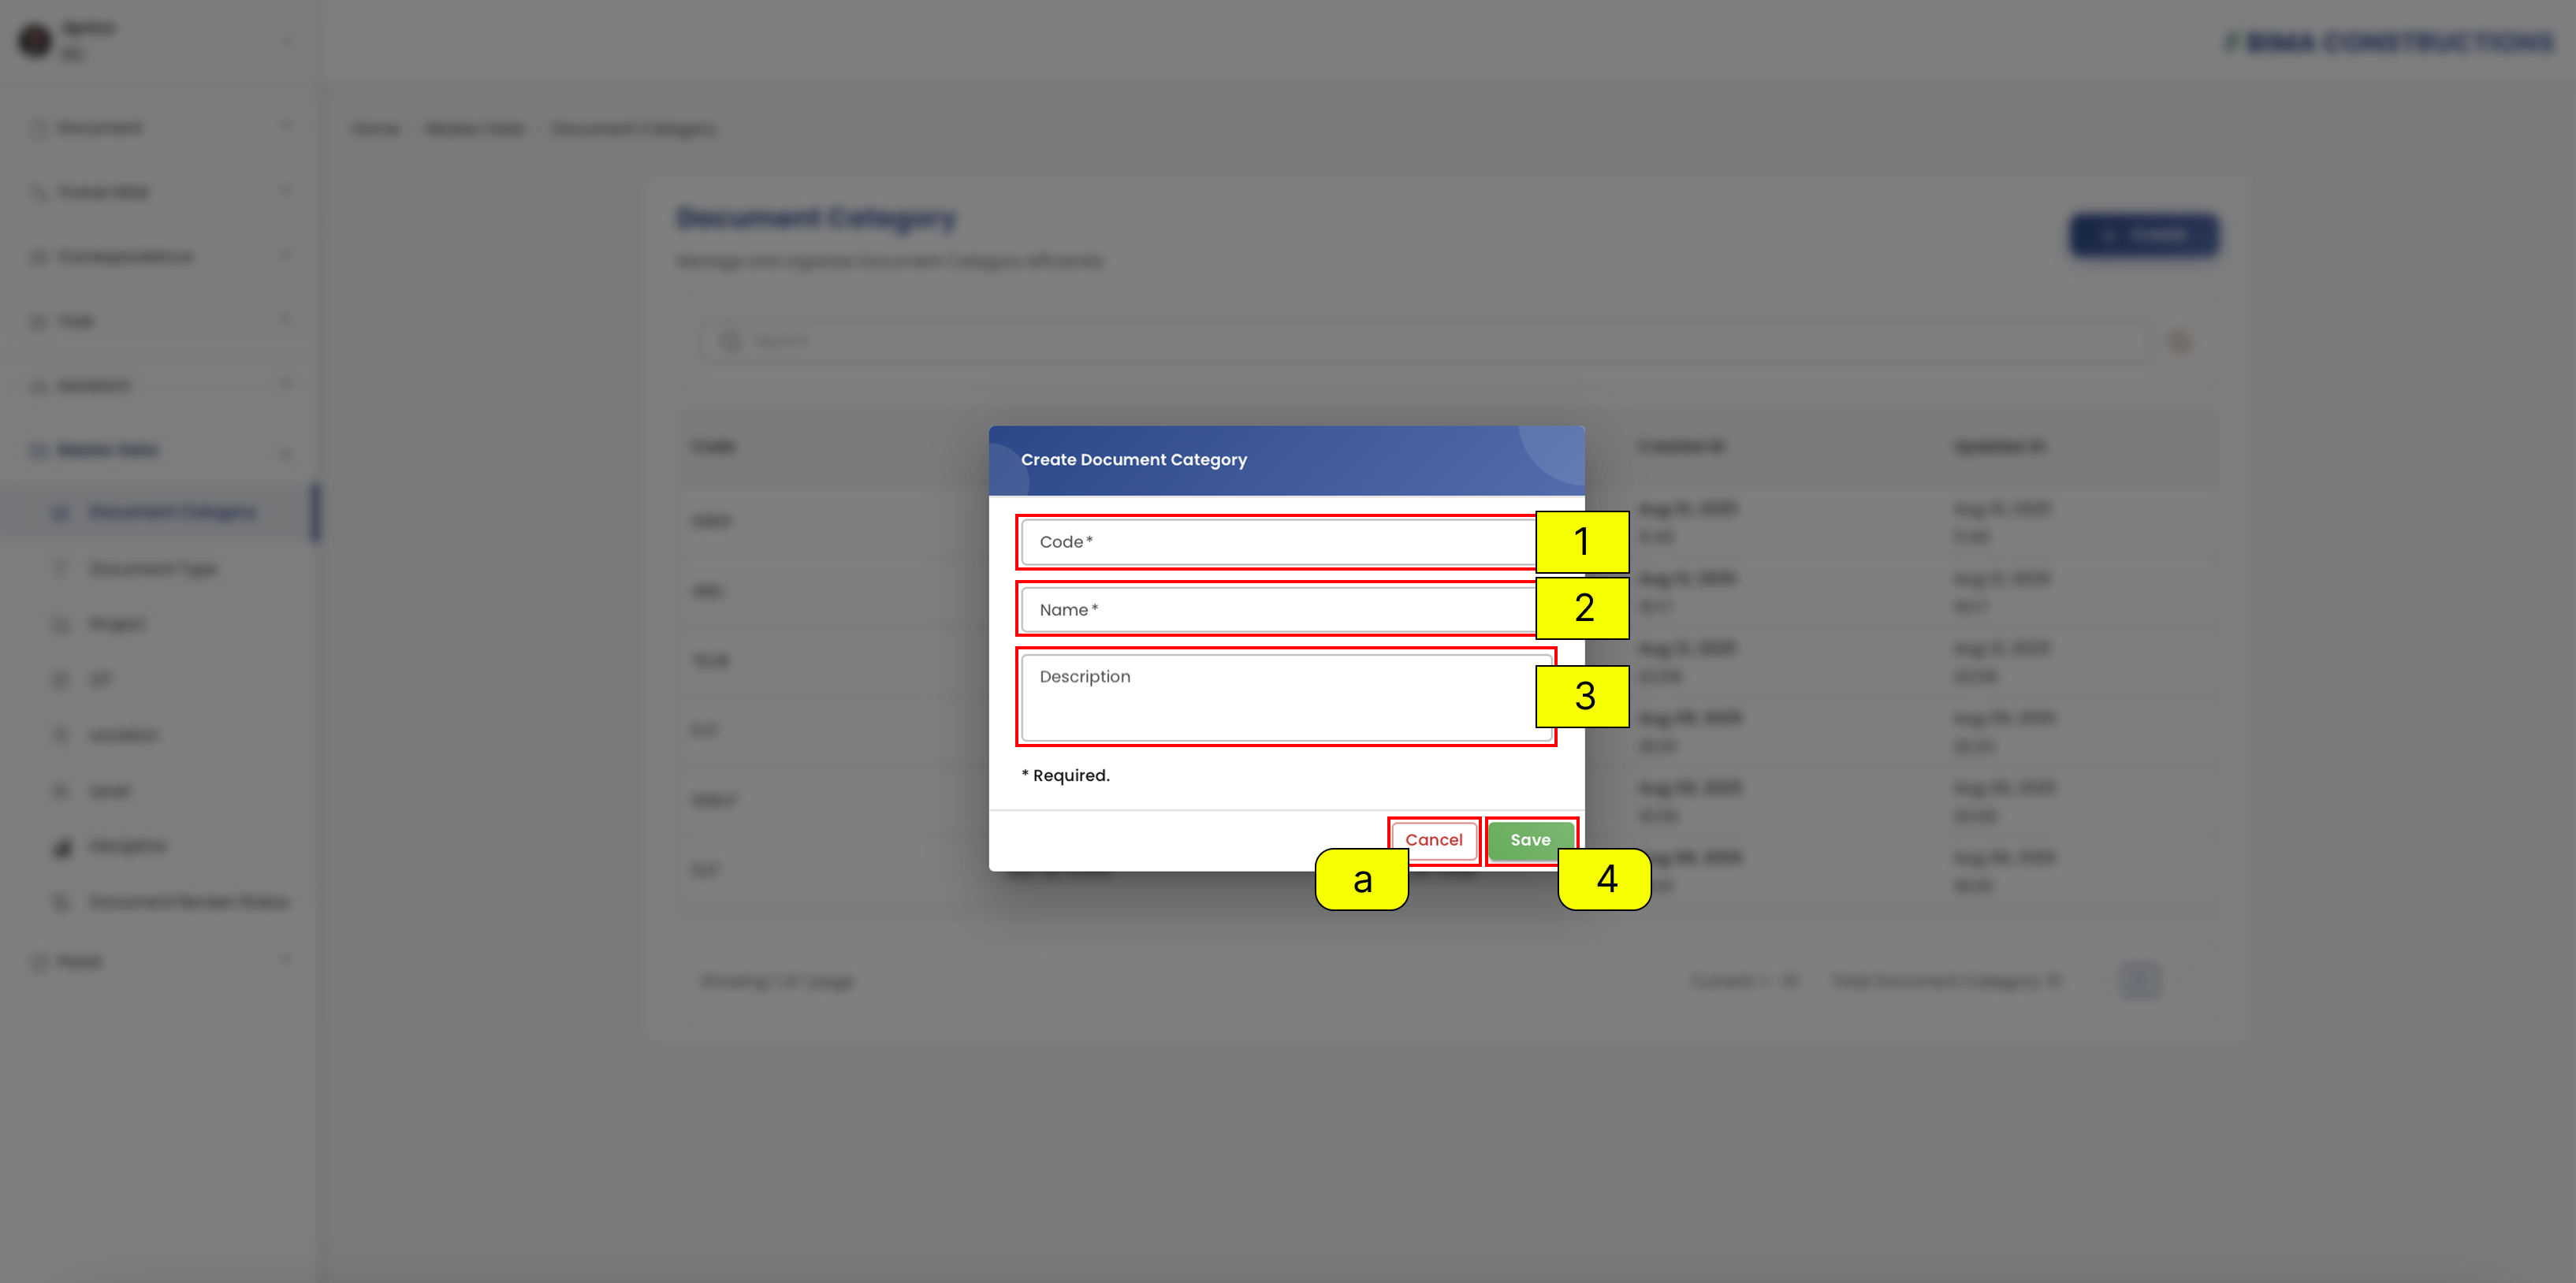
- The Document Controller can fill the
Codefield with a unique identifier for the document category.- The Document Controller can fill the
Namefield for the document category.- The Document Controller can fill the
Descriptionfield for additional details (optional).- After filling in the fields, the Document Controller can click the
Savebutton to create the new category orCancelto discard the action.Succesfully & Check Document Category
After creating a new category, a notification will appear at the bottom right corner saying
Create [Category Name] Successfully. The newly created document category will also appear in the list with its details such as code, name, description, created at, and updated at.
Document Type
The function of Document Type is to classify documents based on their type, making them easier to manage and organize.
Create Document Type
Open Document Type
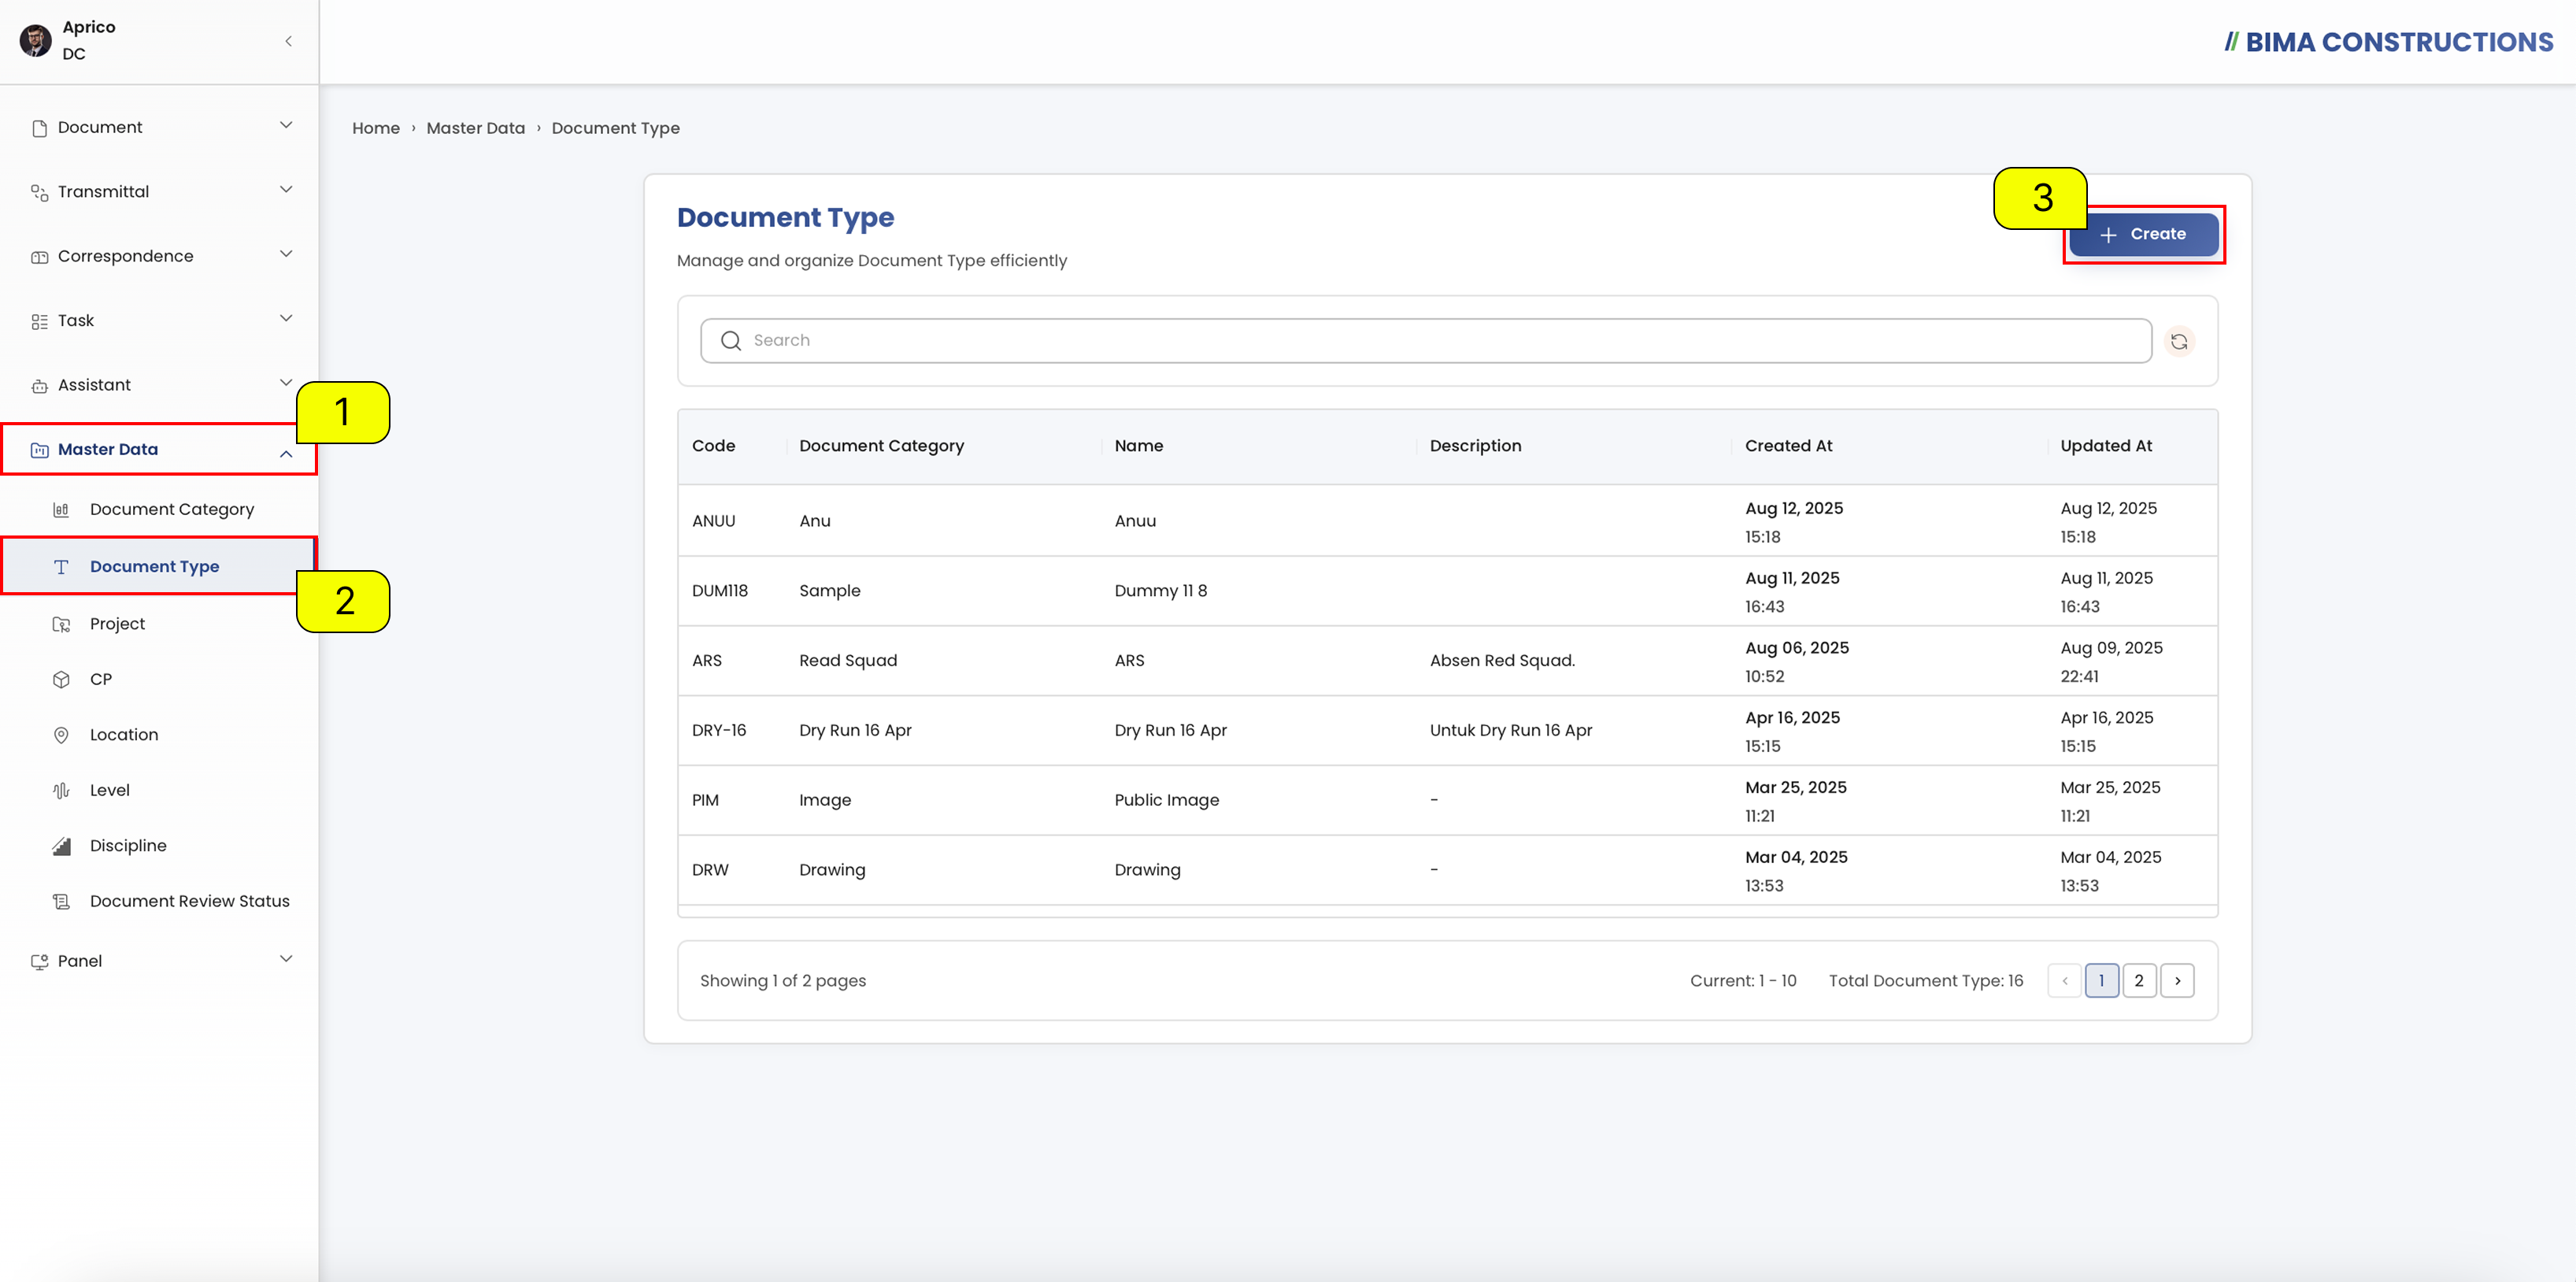
- The Document Controller can click on the
Master Datamenu button to expand its submenu.- The Document Controller can select the
Document Typemenu to view all existing document type.- The Document Controller can click on the
Createbutton to add a new document type.Fill Document Type Form
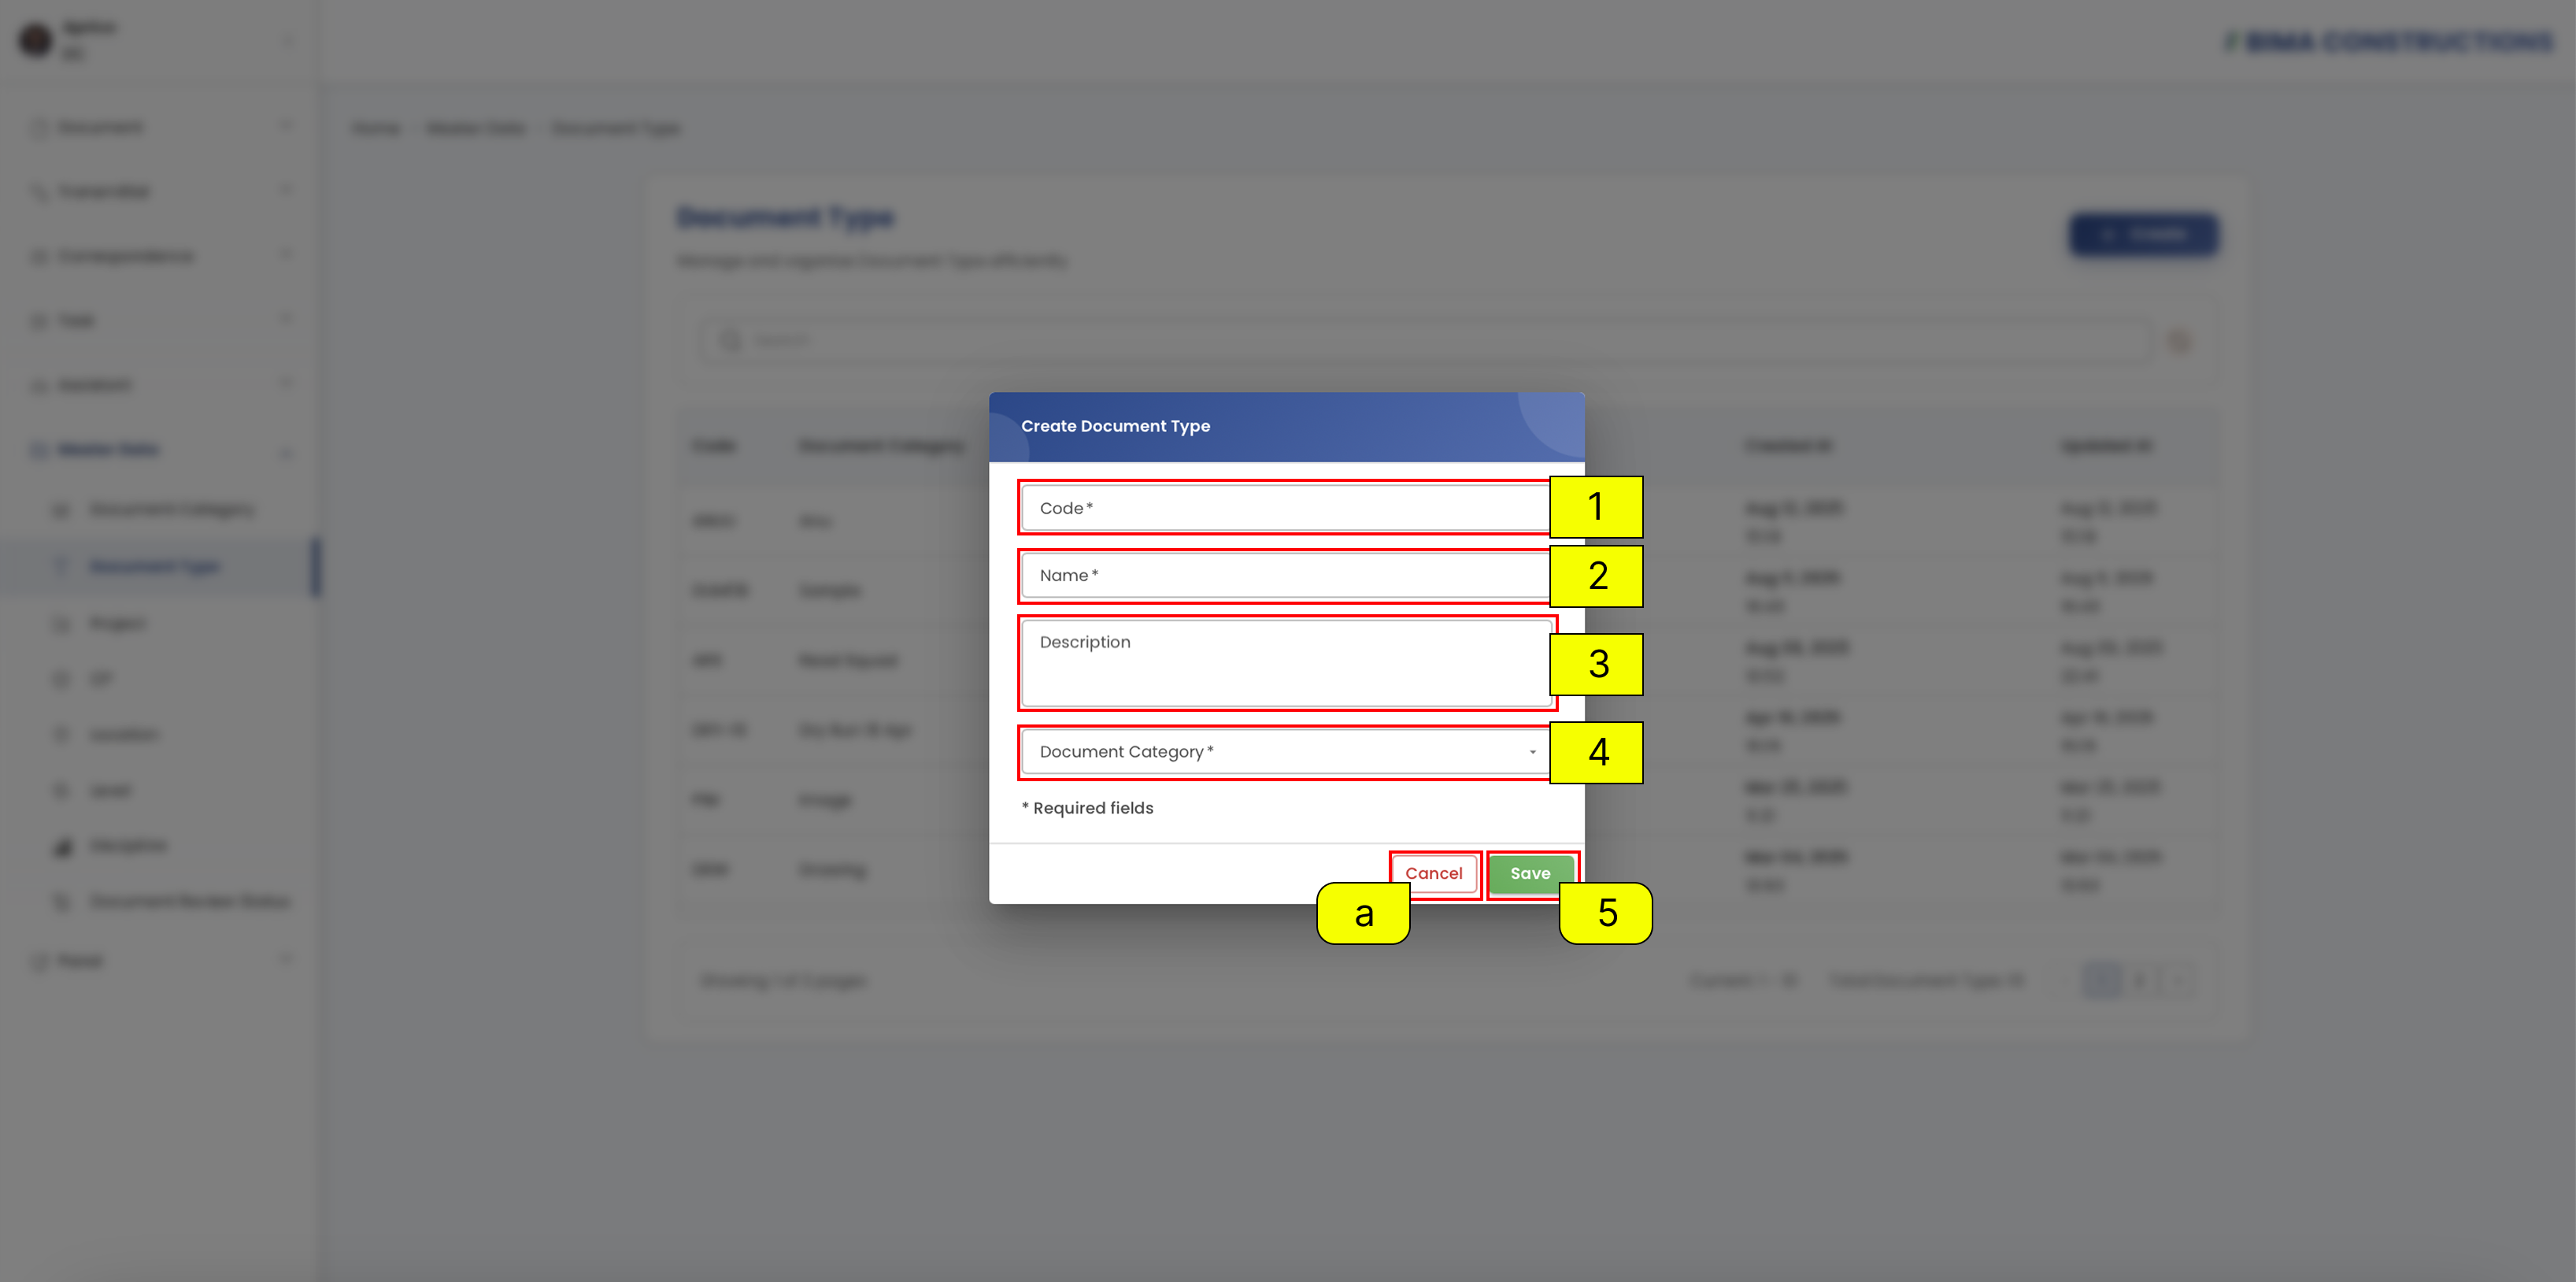
- The Document Controller can fill the
Codefield with a unique identifier for the document type.- The Document Controller can fill the
Namefield for the document type.- The Document Controller can fill the
Descriptionfield for additional details (optional).- The Document Controller must select a
Document Categoryto link the document type.- After filling in the fields, the Document Controller can click the
Savebutton to create the new type orCancelto discard the action.Successfully & Check Document Type
After creating a new document type, a notification will appear at the bottom right corner saying
Create [Document Type Name] Successfully. The newly created document type will also appear in the list with its details such as code, document category, name, description, created at, and updated at.
Project
Create Project
open Project
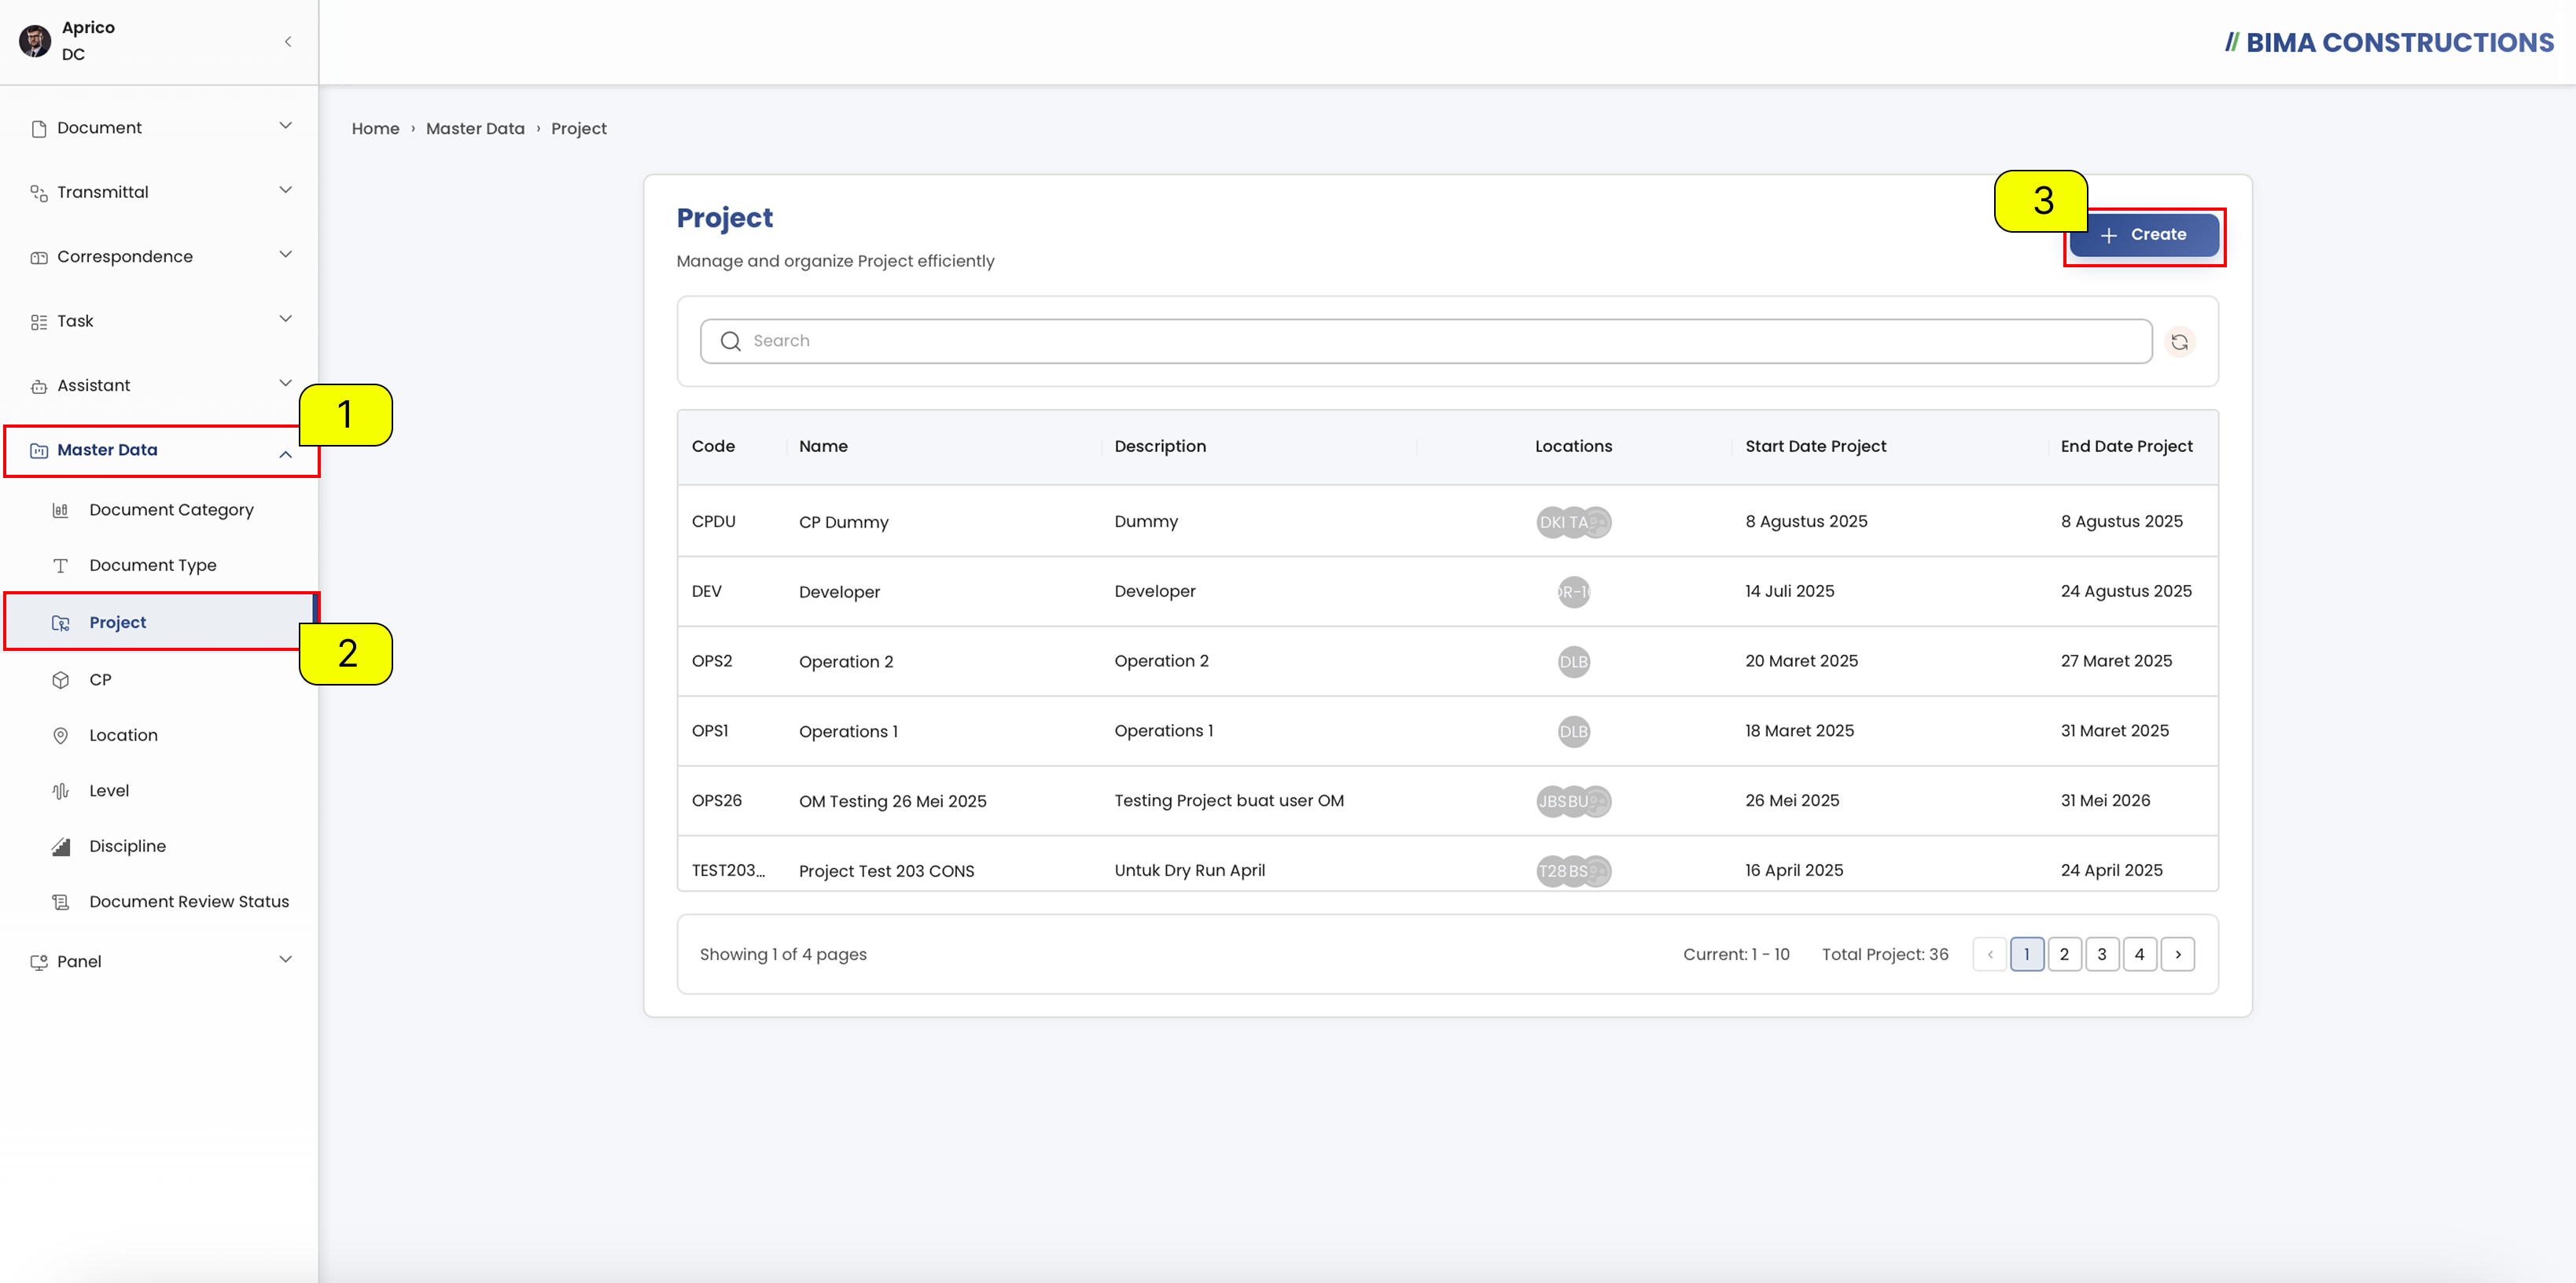
- The Document Controller can click on the
Master Datamenu button to expand its submenu.- The Document Controller can select the
projectmenu to view all existing project.- The Document Controller can click on the
Createbutton to add a new project.Fill Project Form
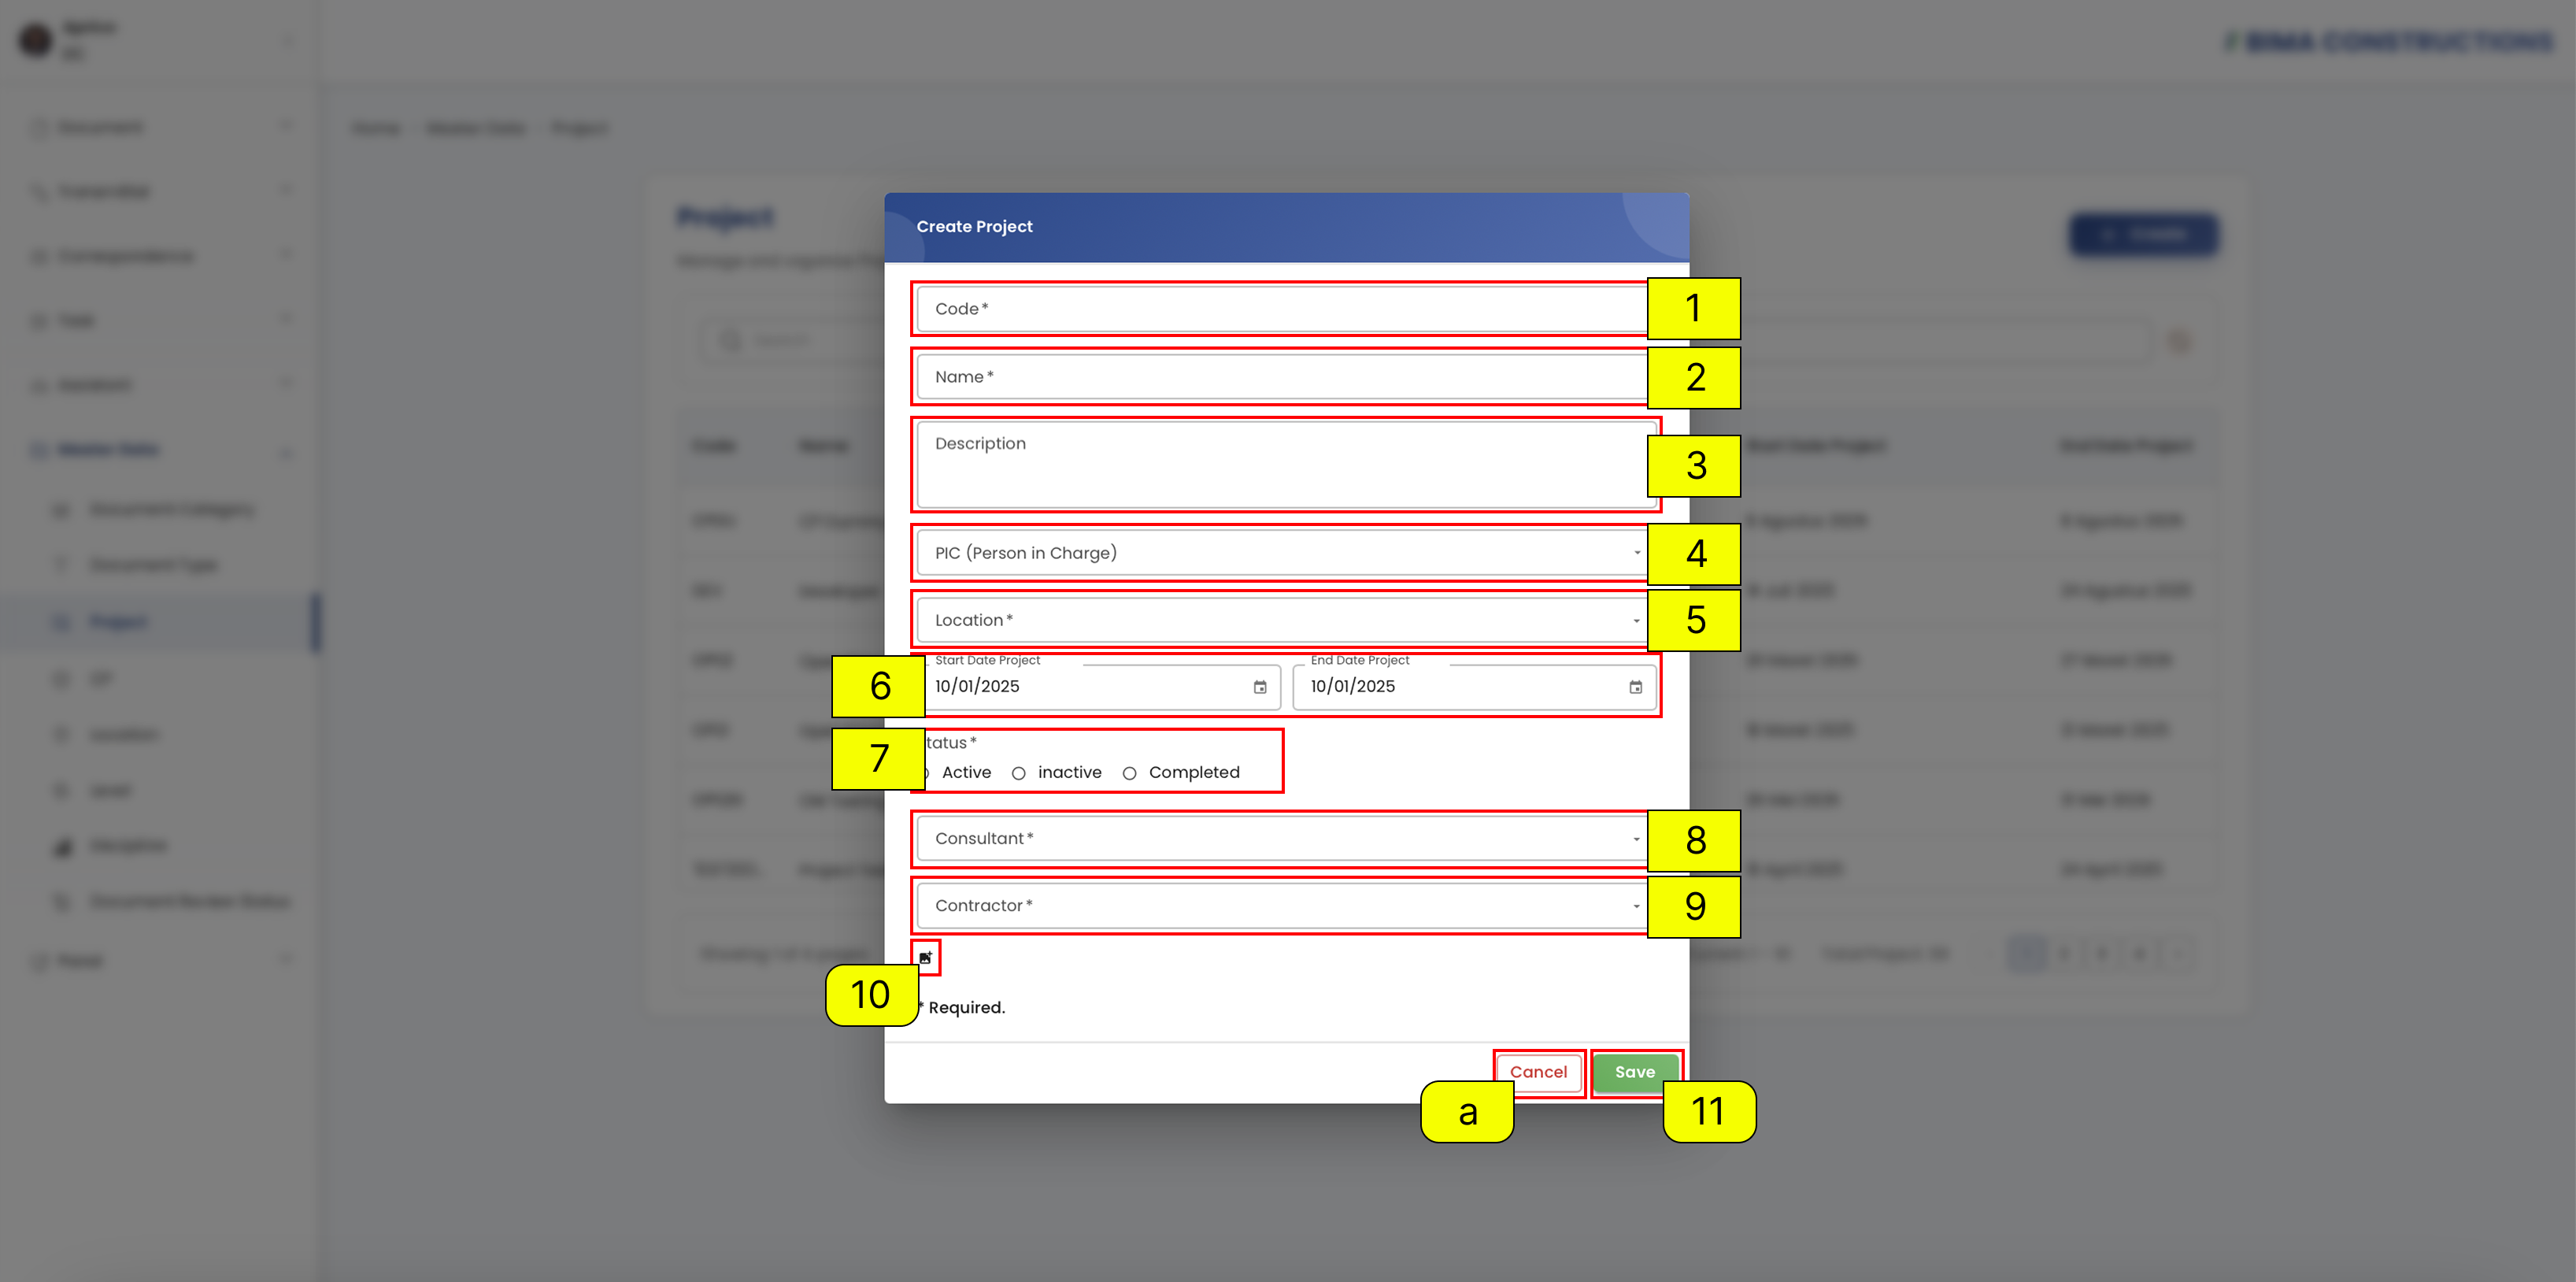
- The Document Controller can fill the
Codefield with a unique identifier for the project.- The Document Controller can fill the
Namefield for the project.- The Document Controller can fill the
Descriptionfield for additional details (optional).- The Document Controller must assign a
PIC(Person in Charge) for the project.- The Document Controller must select the
Locationof the project.- The Document Controller must fill in the
Start DateandEnd Datefor the project timeline.- The Document Controller can set the
Statusof the project (Active, Inactive, or Completed).- The Document Controller must select the
Consultantfor the project.- The Document Controller must select the
Contractorfor the project.- The Document Controller can upload an Attachment such as an image, drawing, or related project document.
- After filling in the fields, the Document Controller can click the
Savebutton to create the project orCancelto discard the action.Successfully & Check Project
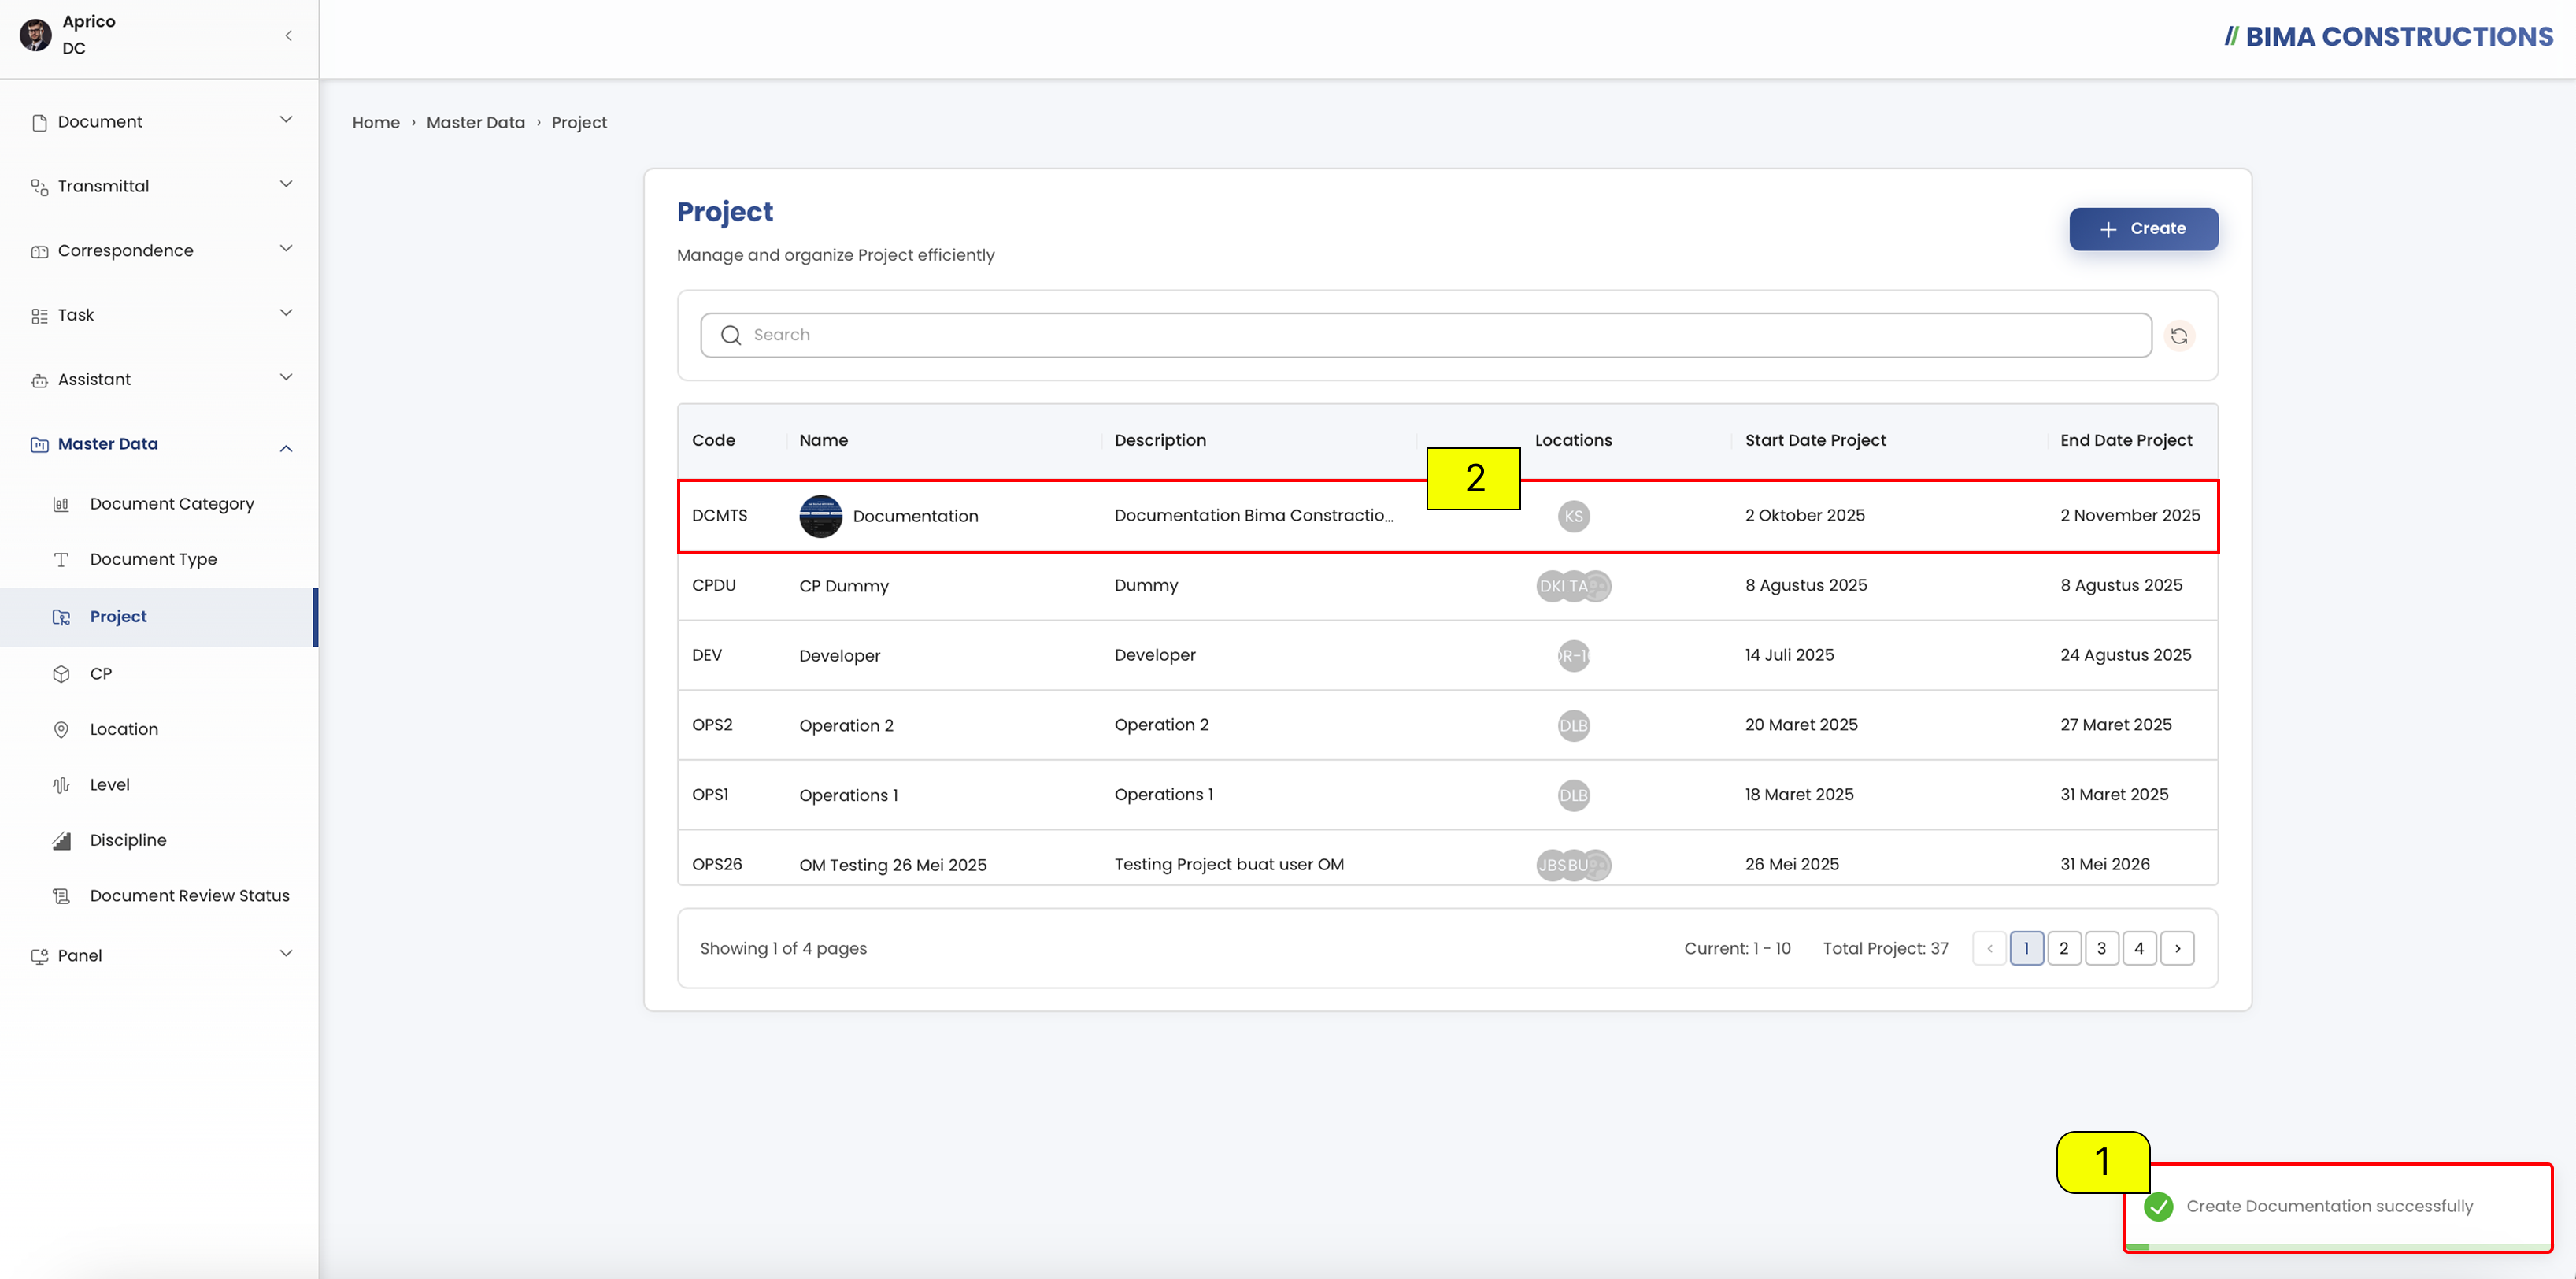
- After creating a new project, a notification will appear at the bottom right corner with the message
Create [Project Name] Successfullyas confirmation that the project has been created.- The newly created project will also automatically appear in the project list with details such as code, name, description, locations, start date, and end date.
CP (Contract Package)
The CP (Contract Package) menu is used to manage and organize contract packages efficiently.
Create CP
Open CP
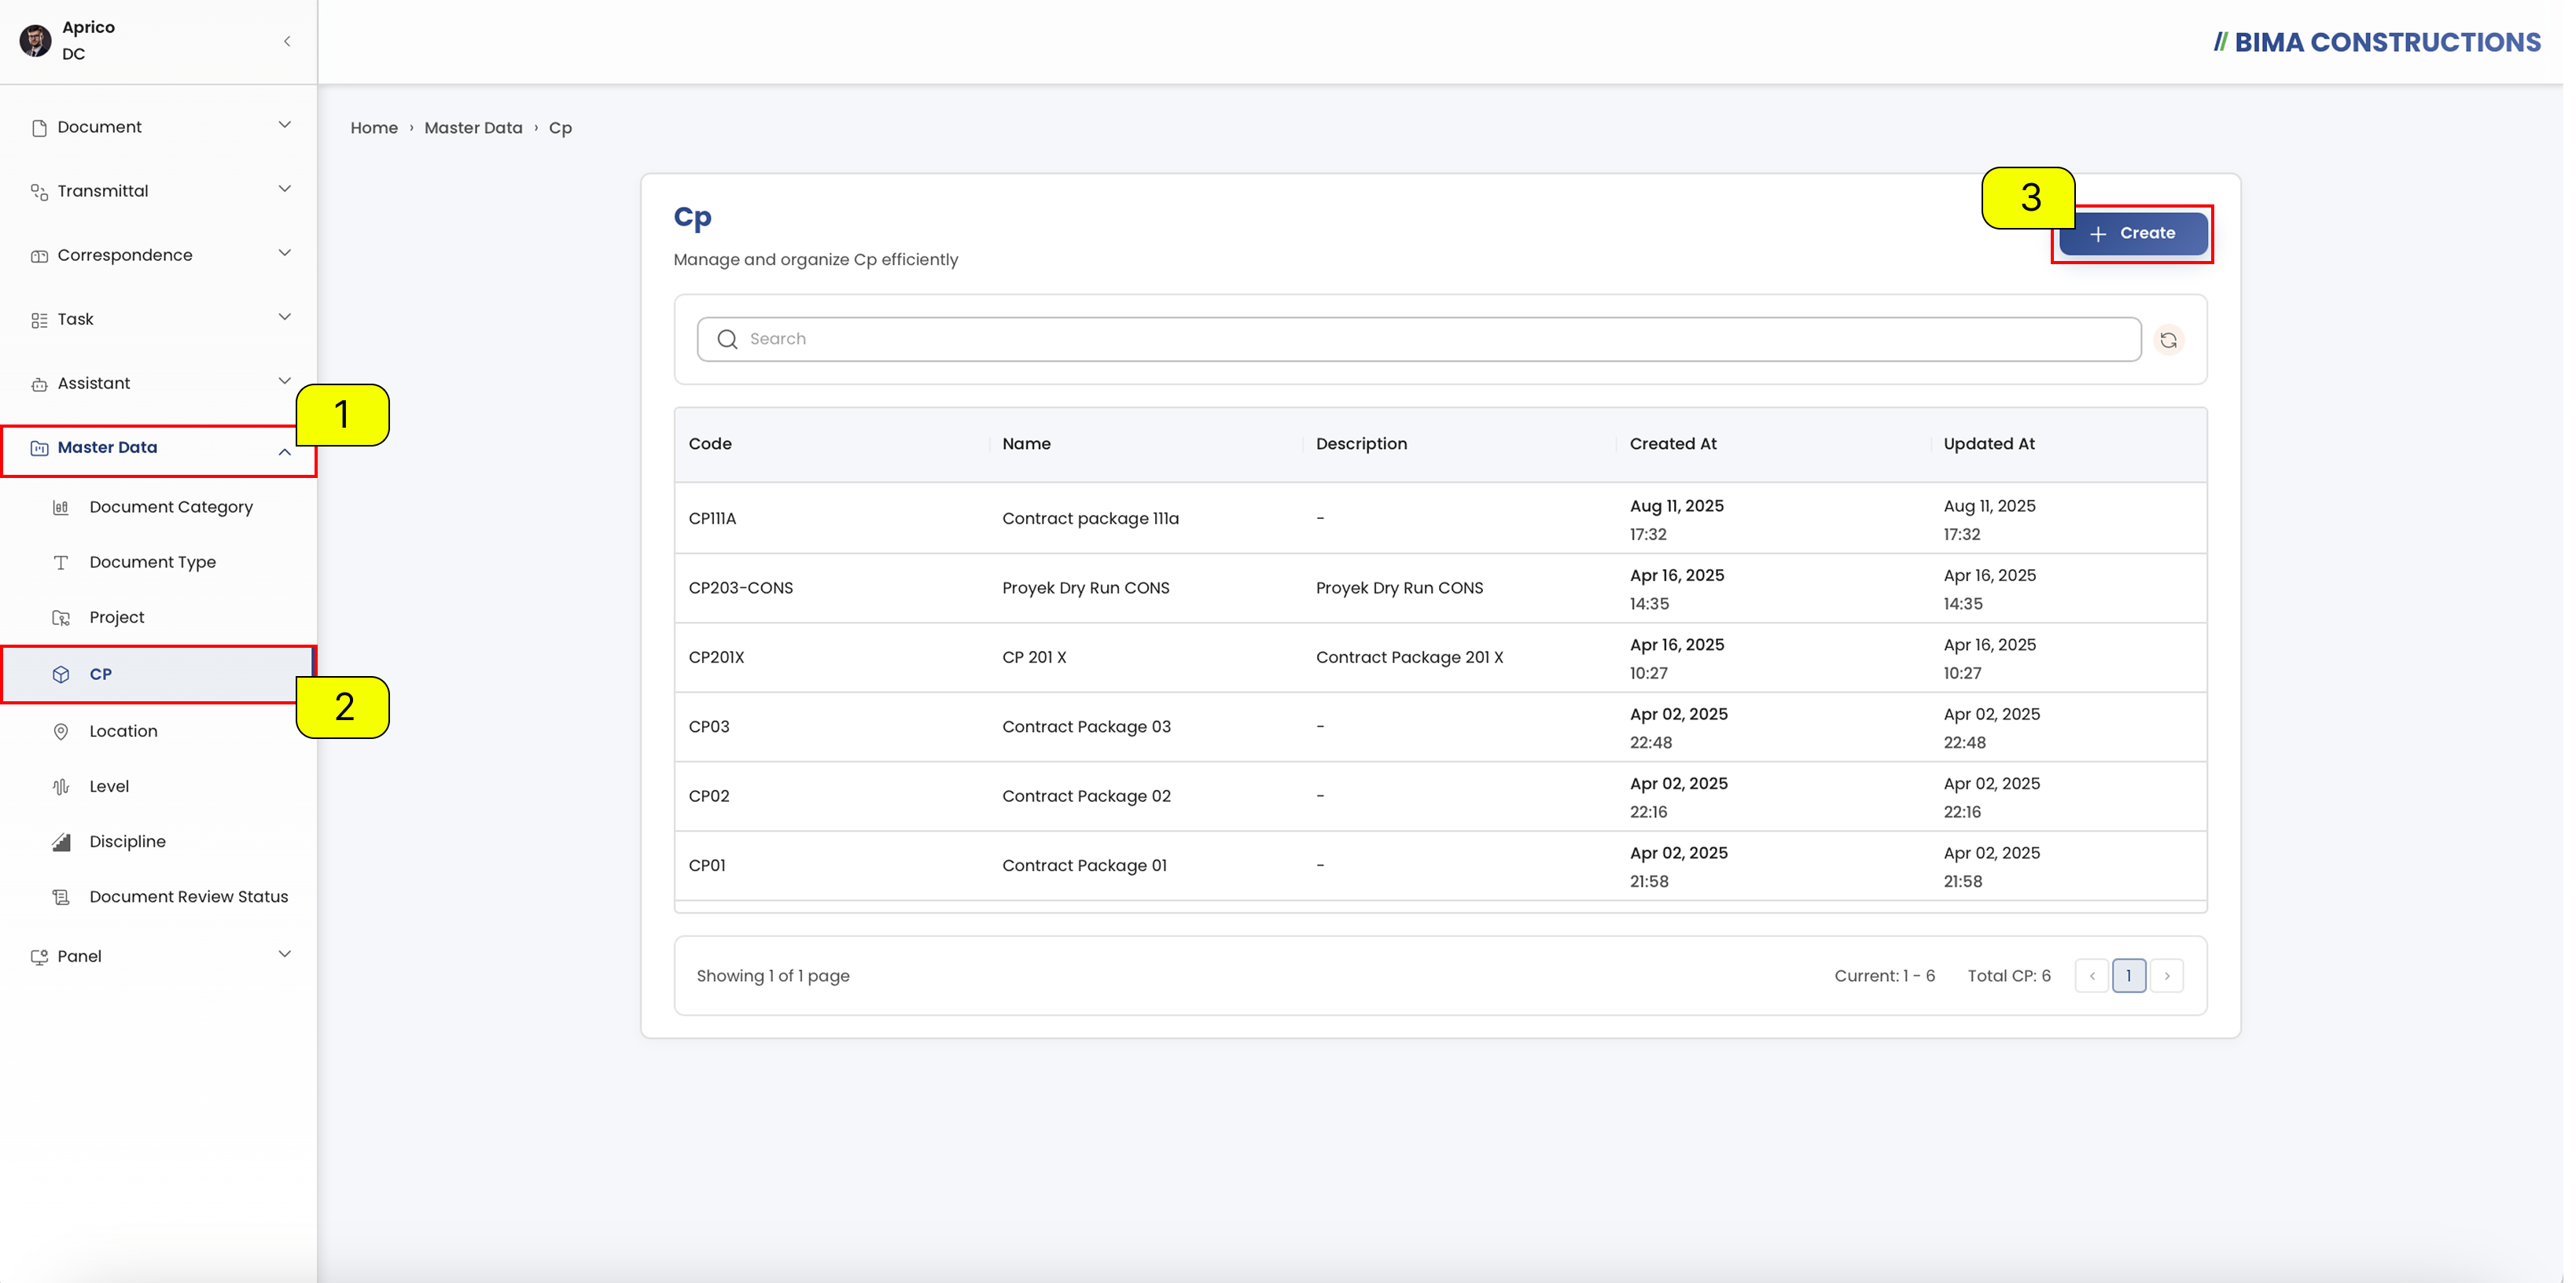
- The Document Controller can click on the
Master Datamenu button to expand its submenu.- The Document Controller can select the
CPmenu to view all existing Contract Package.- The Document Controller can click on the
Createbutton to add a new Contract Package.Fill CP Form
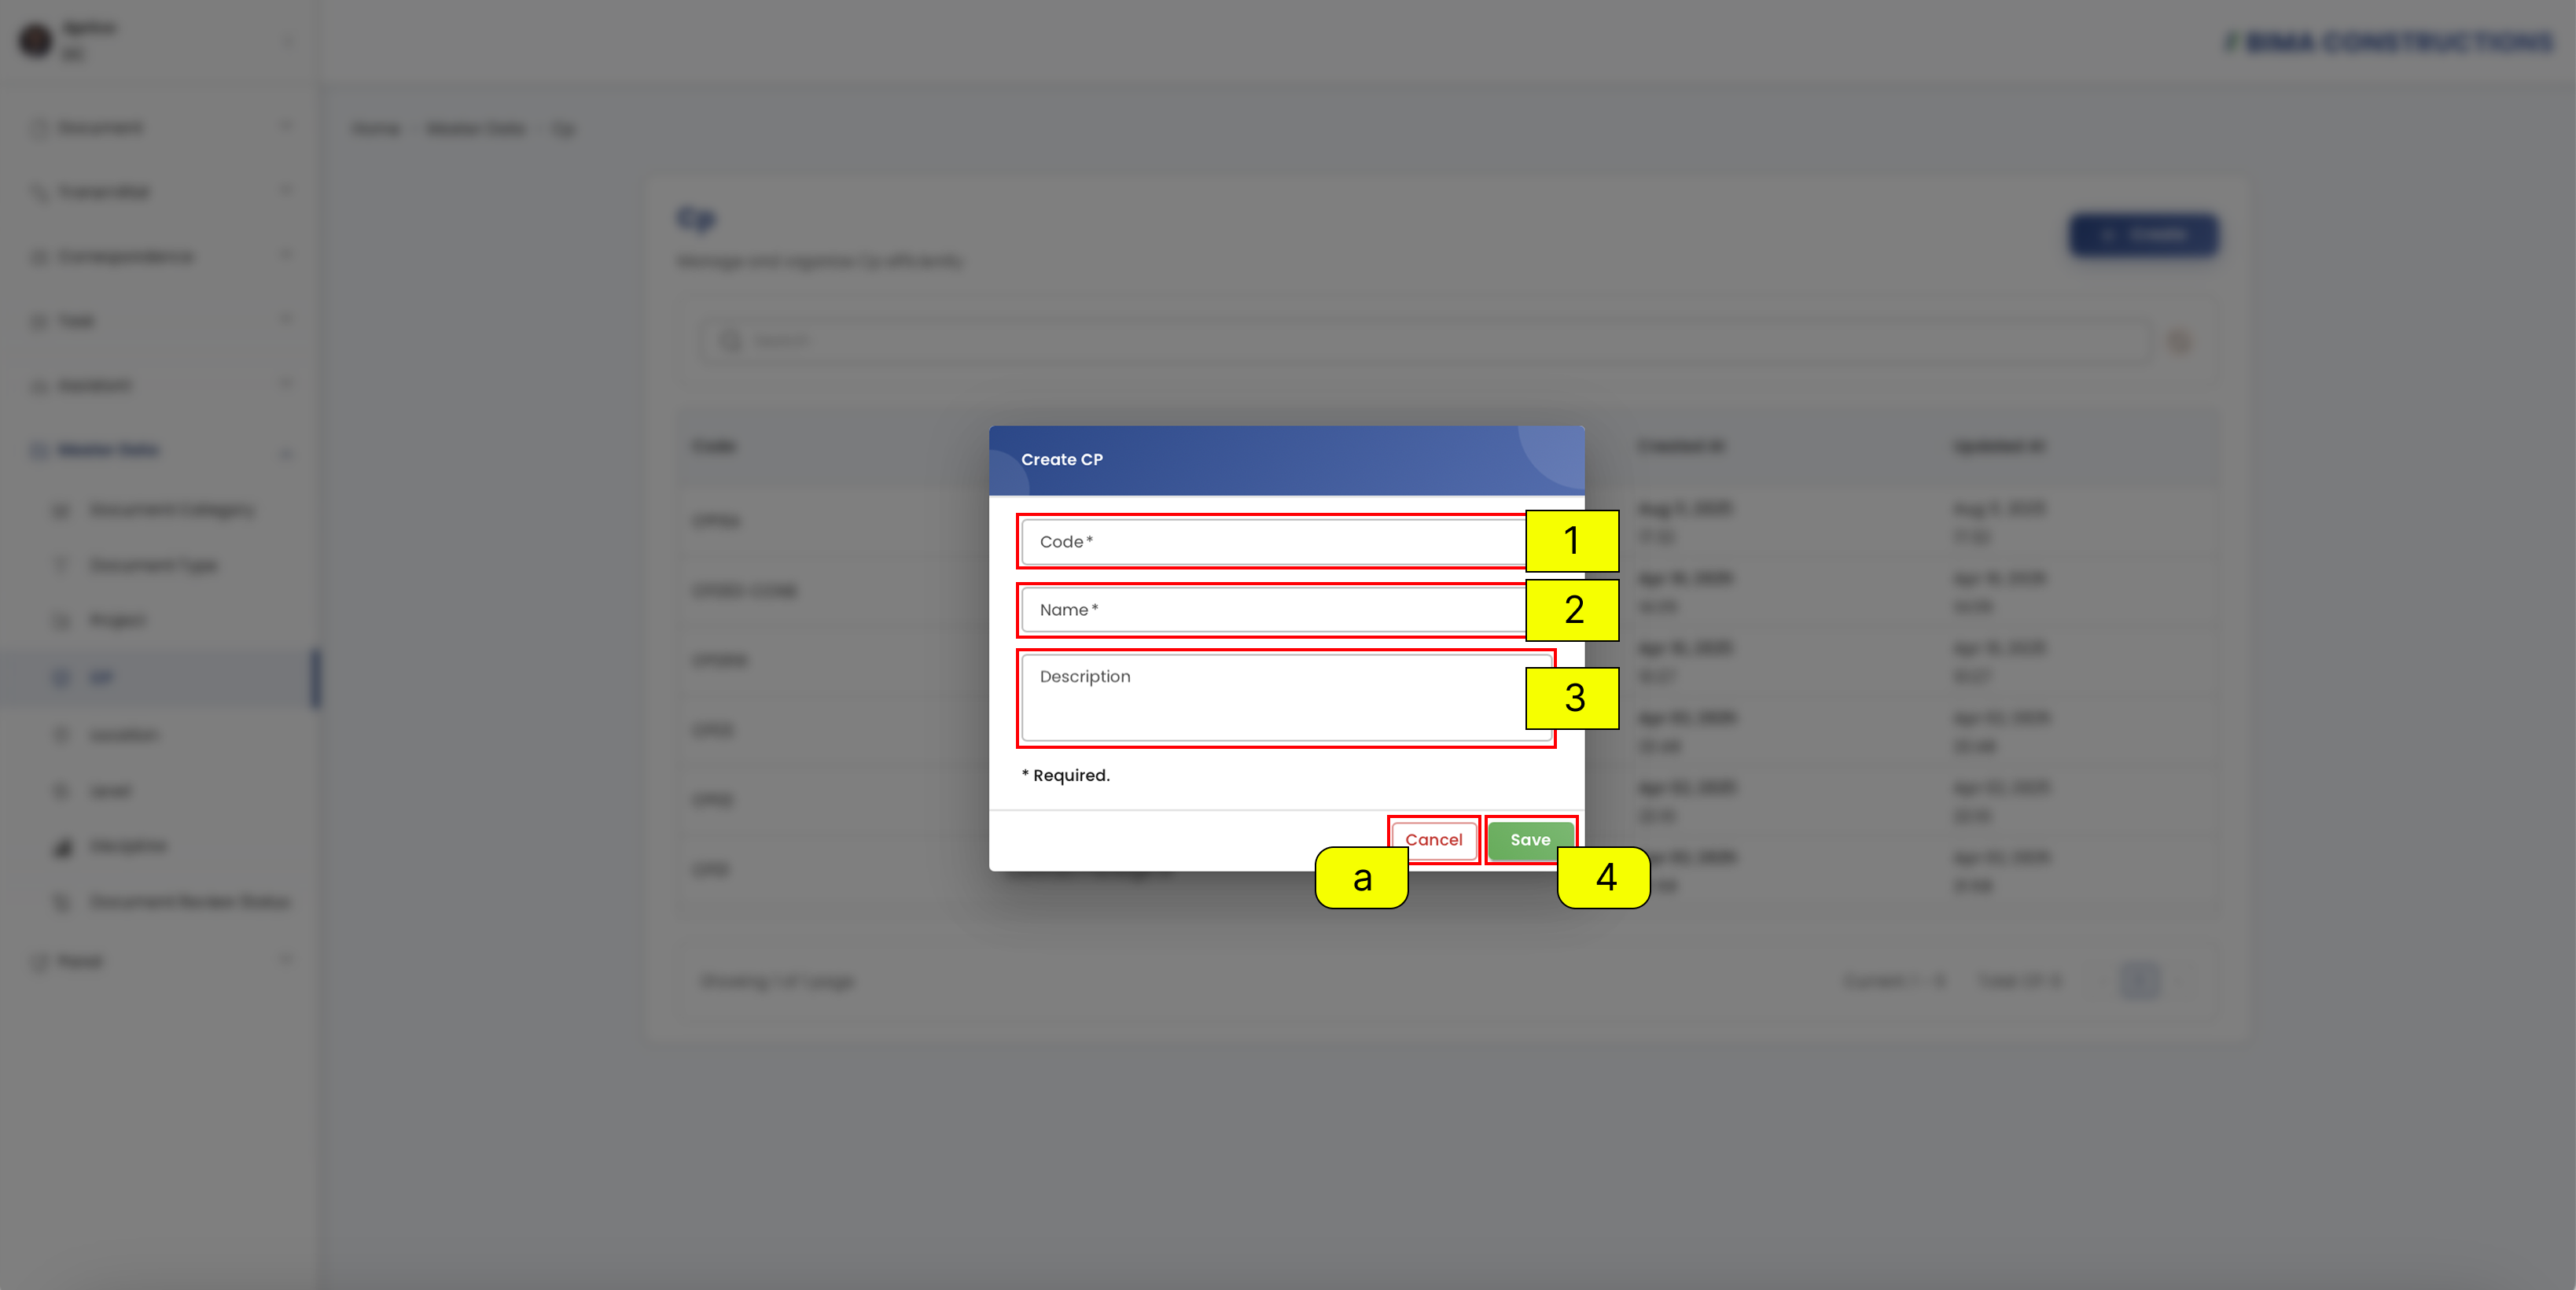
- The Document Controller can fill the
Codefield with a unique identifier for the CP.- The Document Controller can fill the
Namefield for the CP.- The Document Controller can fill the
Descriptionfield for additional details (optional).- After filling in the fields, the Document Controller can click the
Savebutton to create the new CP orCancelto discard the action.Successfully & Check CP
After creating a new CP, a notification will appear at the bottom right corner with the message
Create [CP Name] Successfullyas confirmation that the CP has been created. The newly created CP will also automatically appear in the CP list with details such as code, name, description, created at, and updated at.
Location
The Location menu is used to manage and organize project or site locations efficiently.
Create Location
Open Location
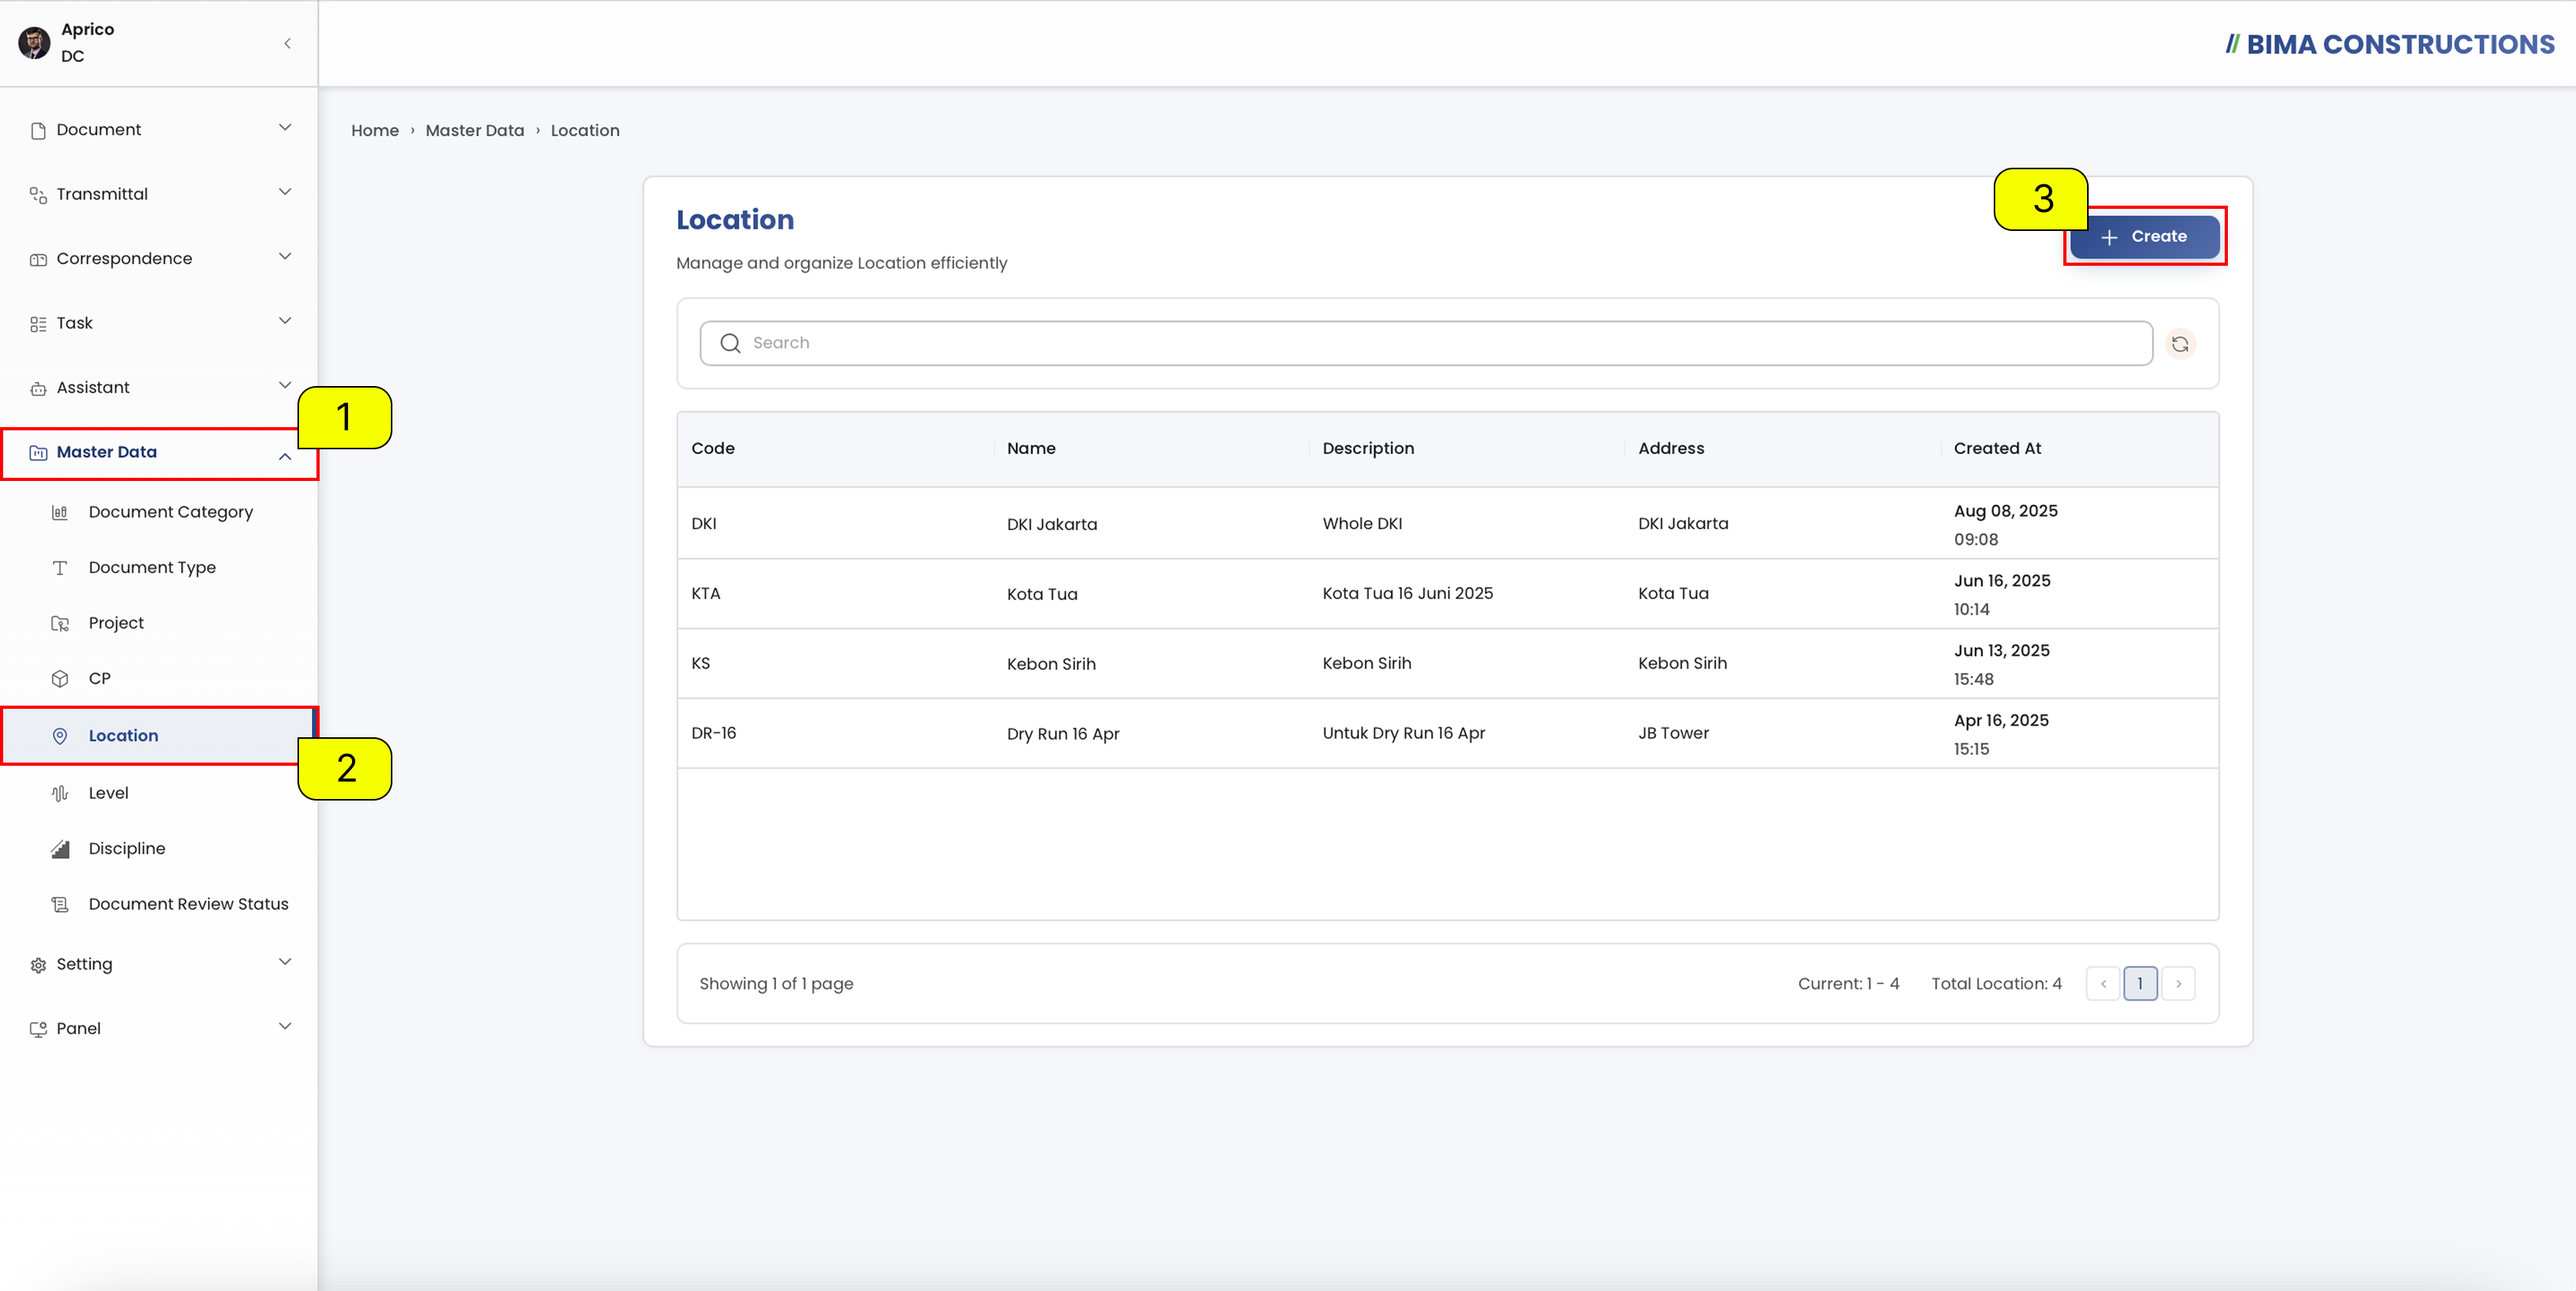
- The Document Controller can click on the
Master Datamenu button to expand its submenu.- The Document Controller can select the
Locationmenu to view all existing Location.- The Document Controller can click on the
Createbutton to add a new Location.Fill Location Form
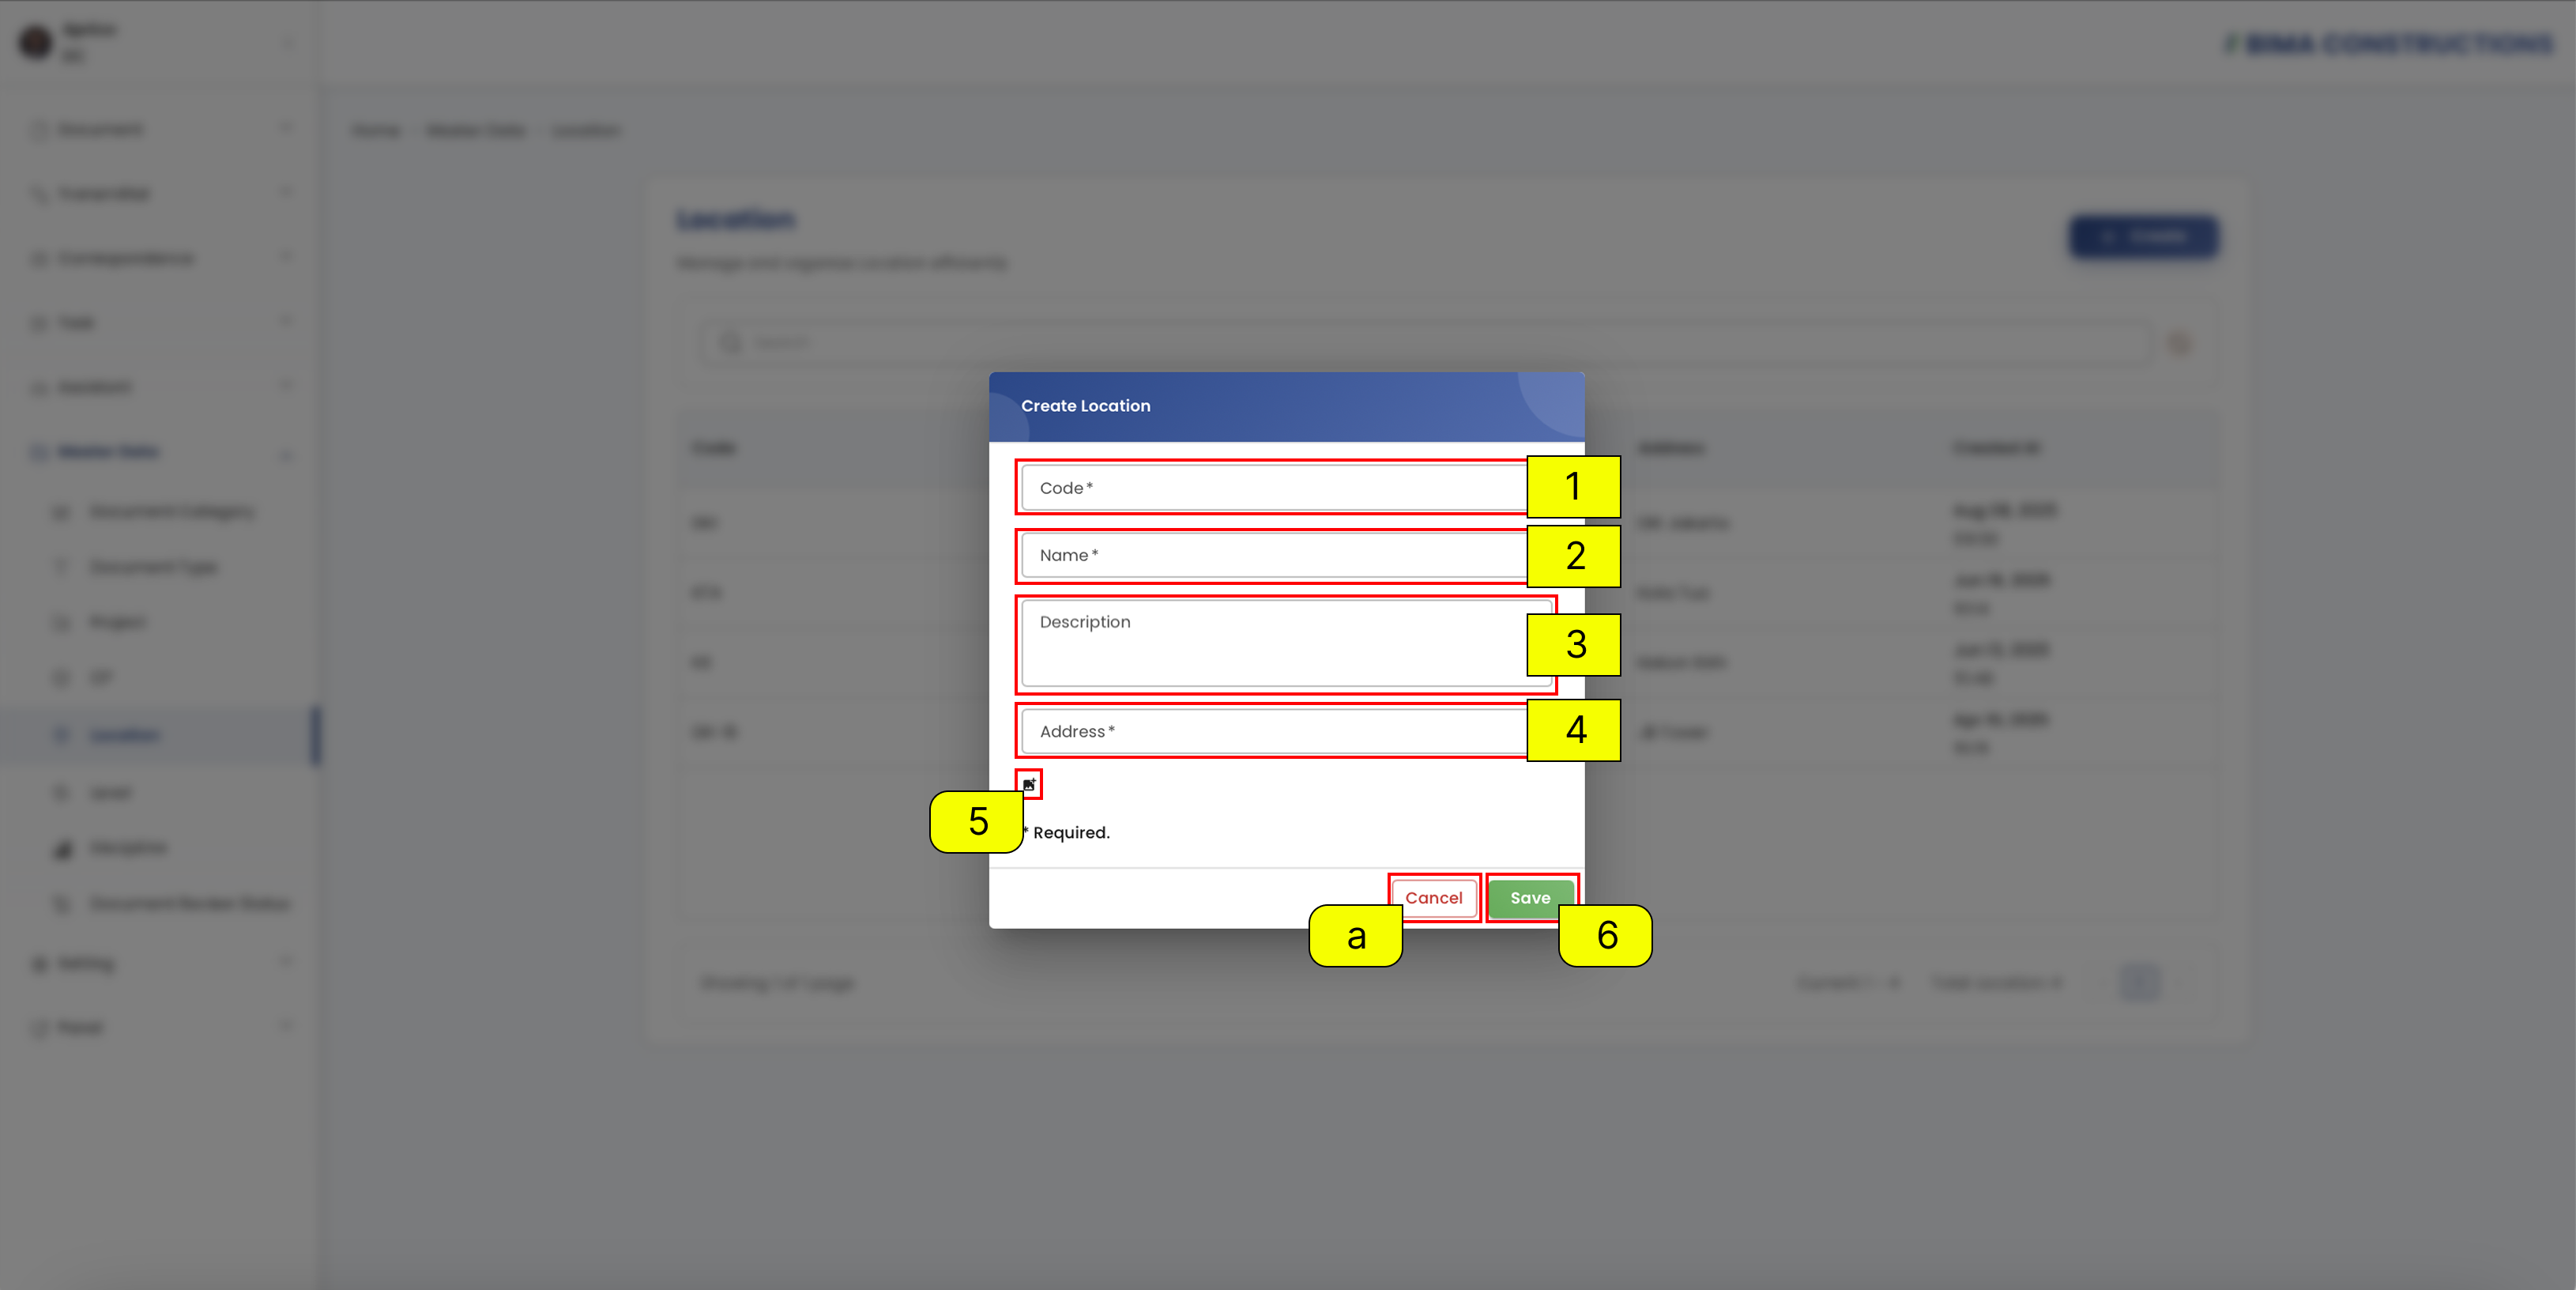
- The Document Controller can fill the
Codefield with a unique identifier for the location.- The Document Controller can fill the
Namefield for the location.- The Document Controller can fill the
Descriptionfield for additional details (optional).- The Document Controller can fill the
Addressfield for the location.- The Document Controller can upload an Attachment such as an image, drawing, or related project document.
- After filling in the fields, the Document Controller can click the
Savebutton to create the new location orCancelto discard the action.Successfully & Check Location
After creating a new Location, a notification will appear at the bottom right corner with the message
Create [Location Name] Successfullyas confirmation that the Location has been created. The newly created Location will also automatically appear in the CP list with details such as code, name, description, address, created at, and updated at.
Level
The Level menu is used to manage and organize levels efficiently.
Create Level
Open Level
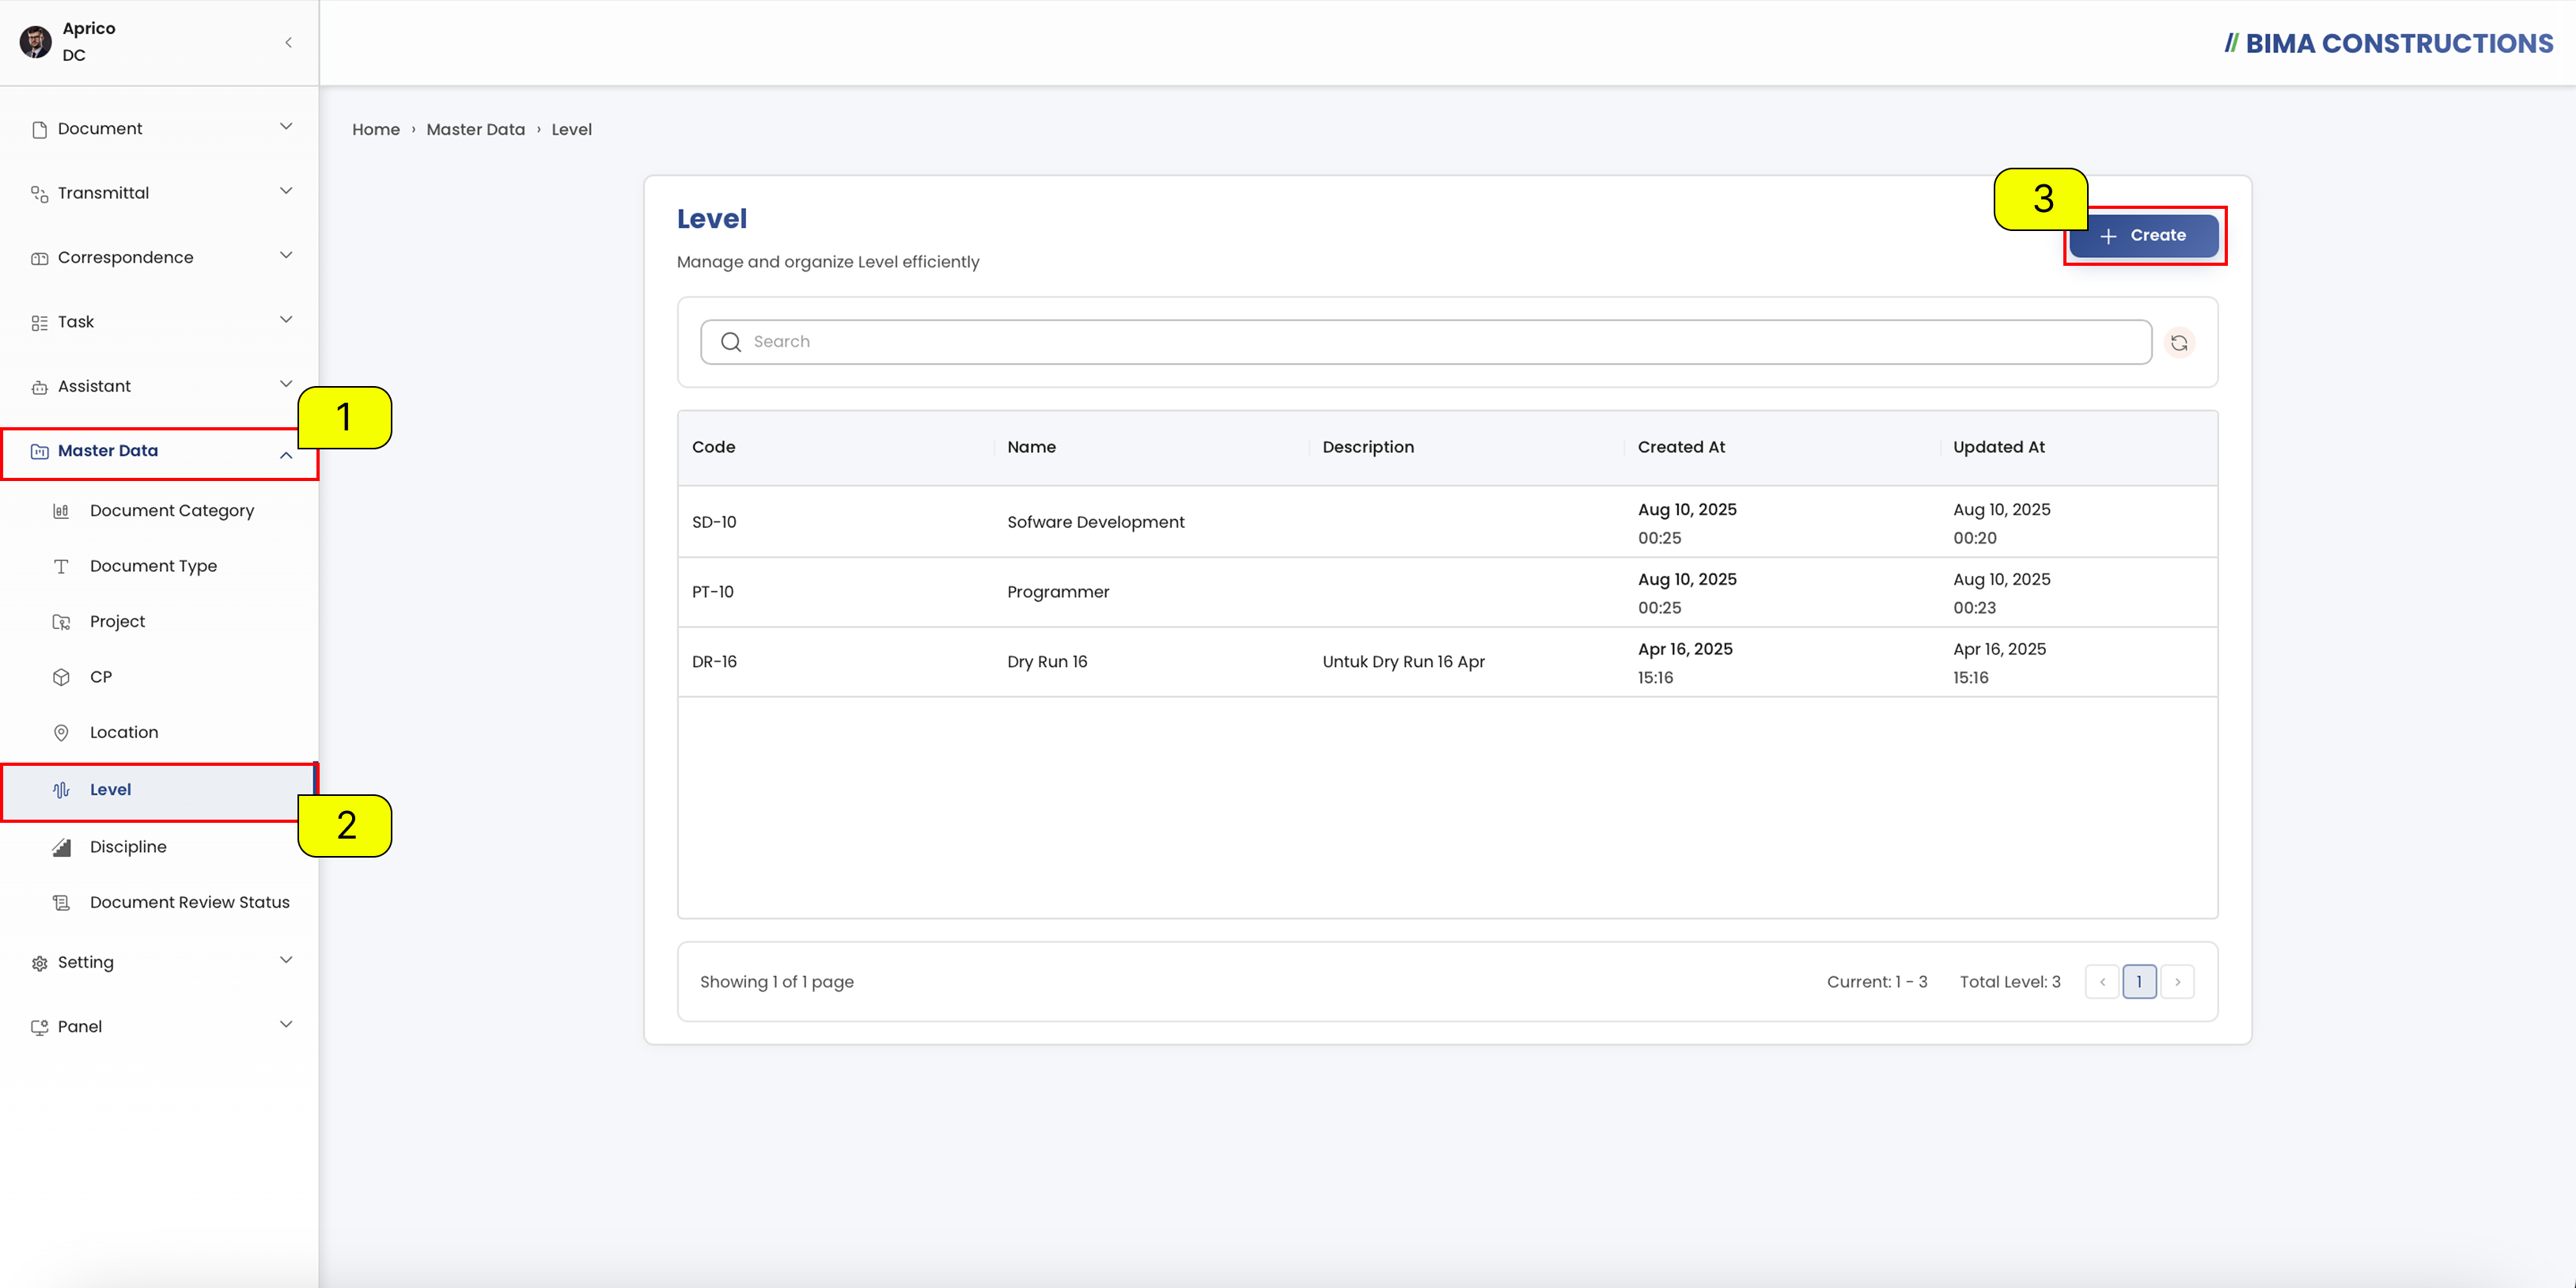
- The Document Controller can click on the
Master Datamenu button to expand its submenu.- The Document Controller can select the
Levelmenu to view all existing Level.- The Document Controller can click on the
Createbutton to add a new Level.Fill Level Form
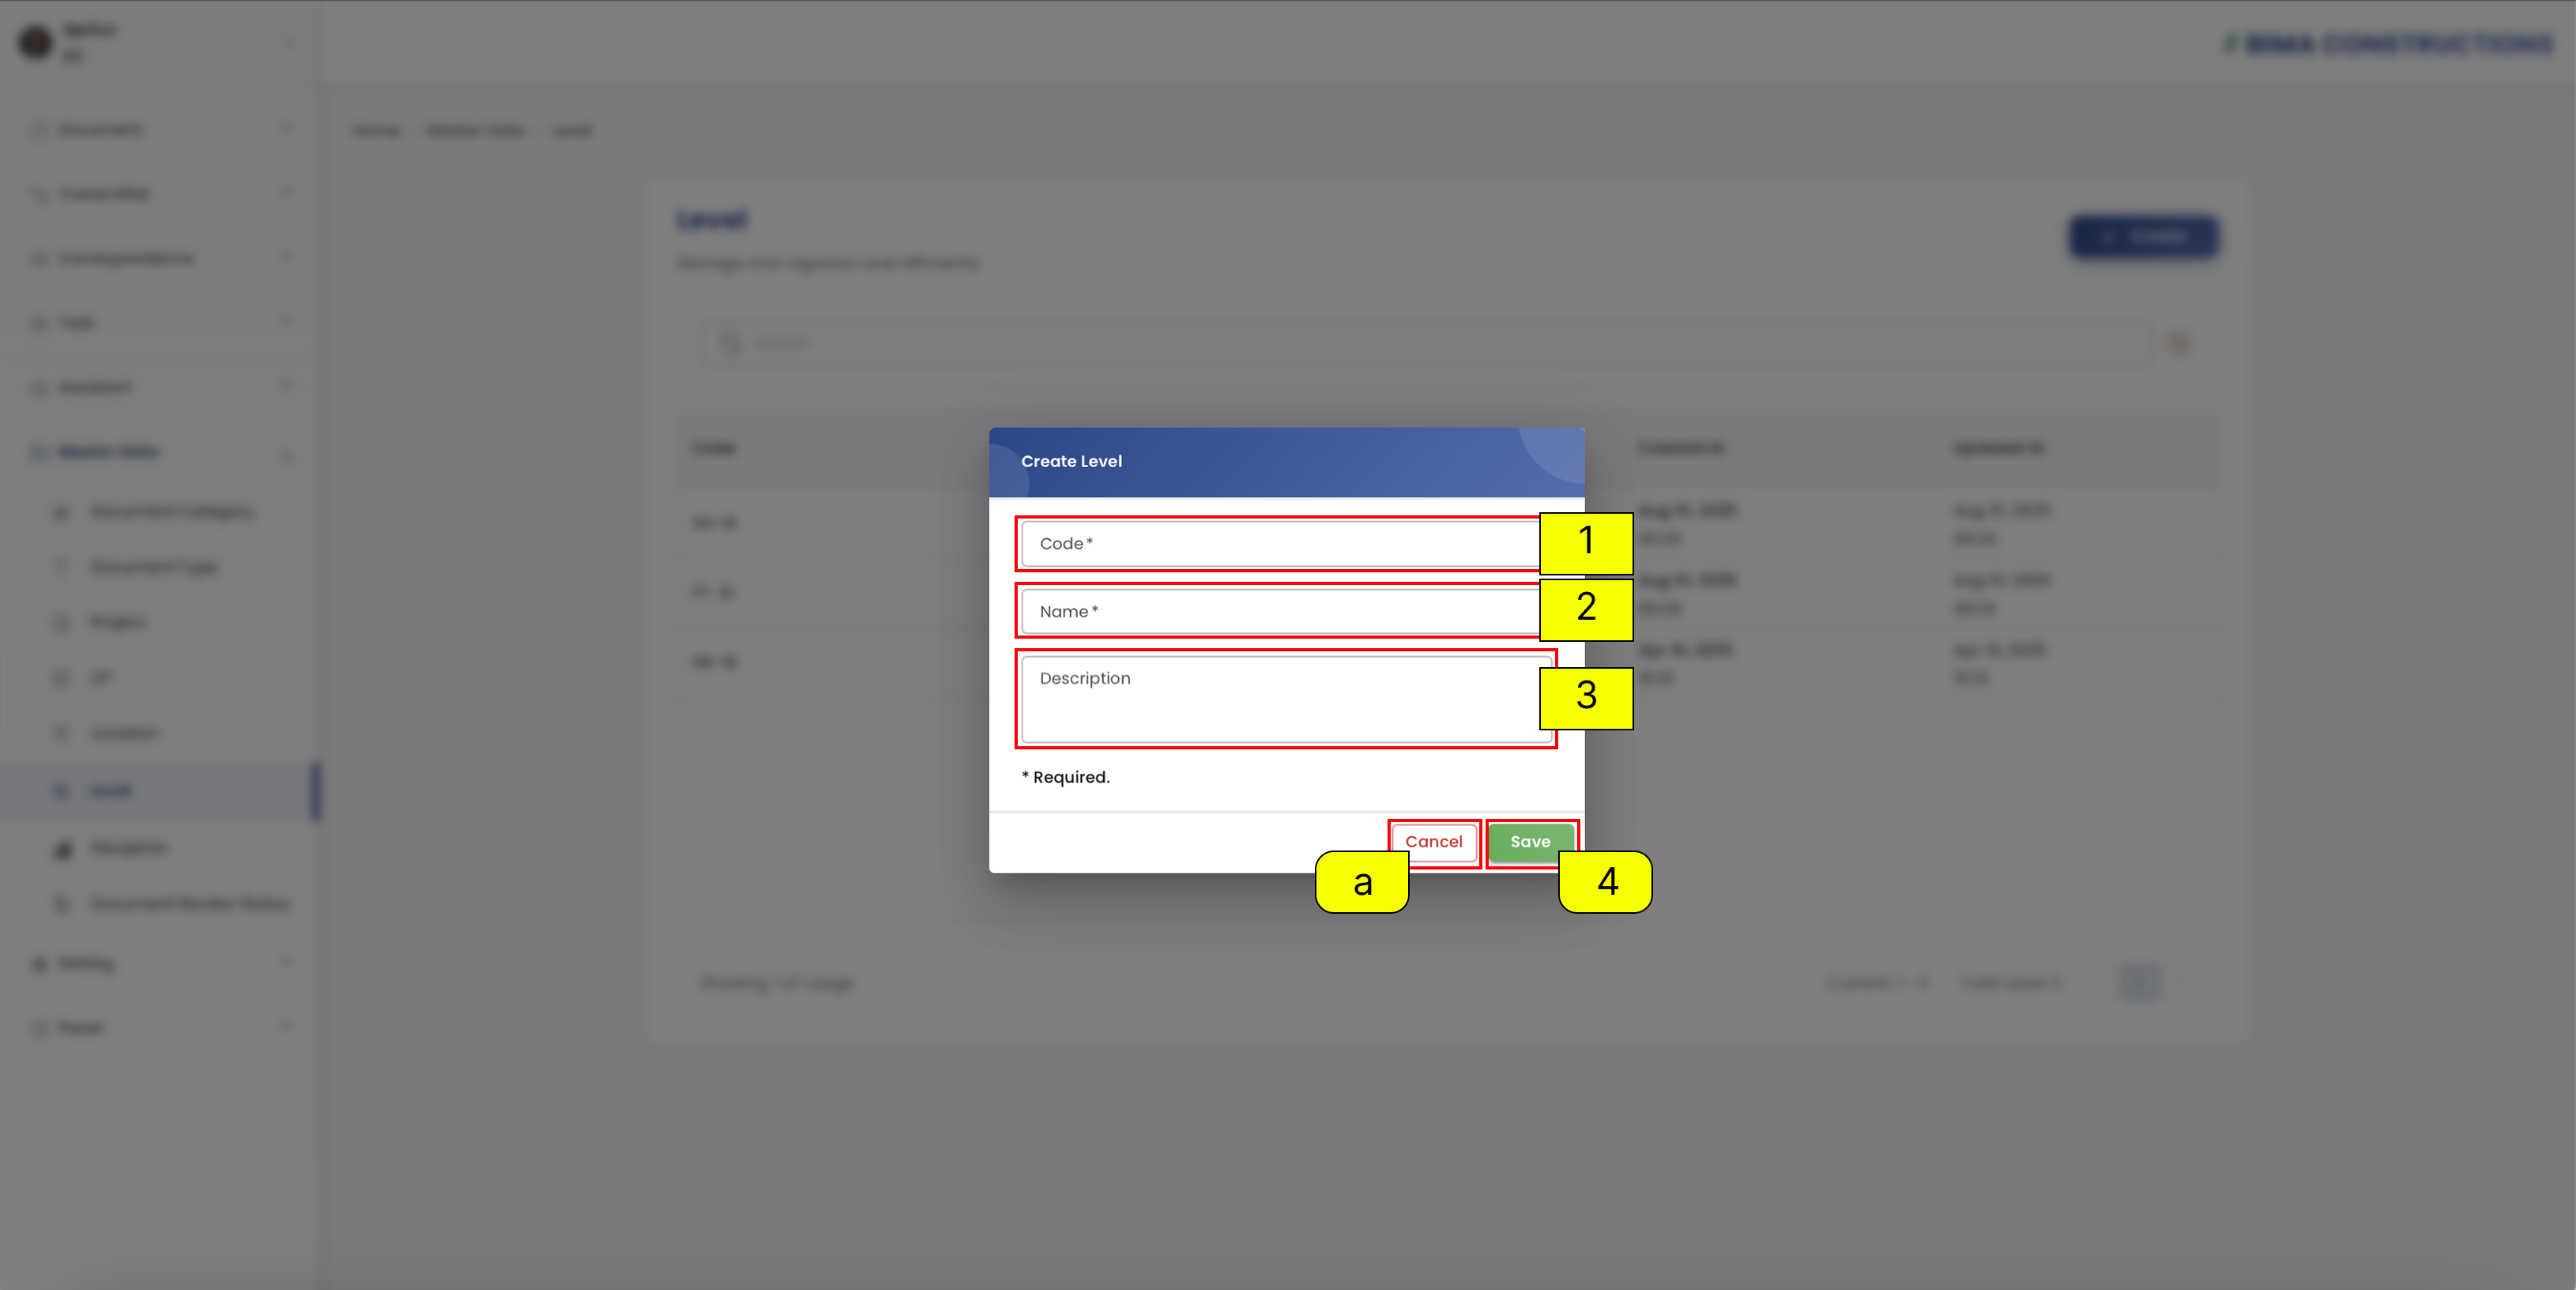
- The Document Controller can fill the
Codefield with a unique identifier for the level.- The Document Controller can fill the
Namefield for the level.- The Document Controller can fill the
Descriptionfield for additional details (optional).- After filling in the fields, the Document Controller can click the
Savebutton to create the new level orCancelto discard the action.Successfully & Check Level
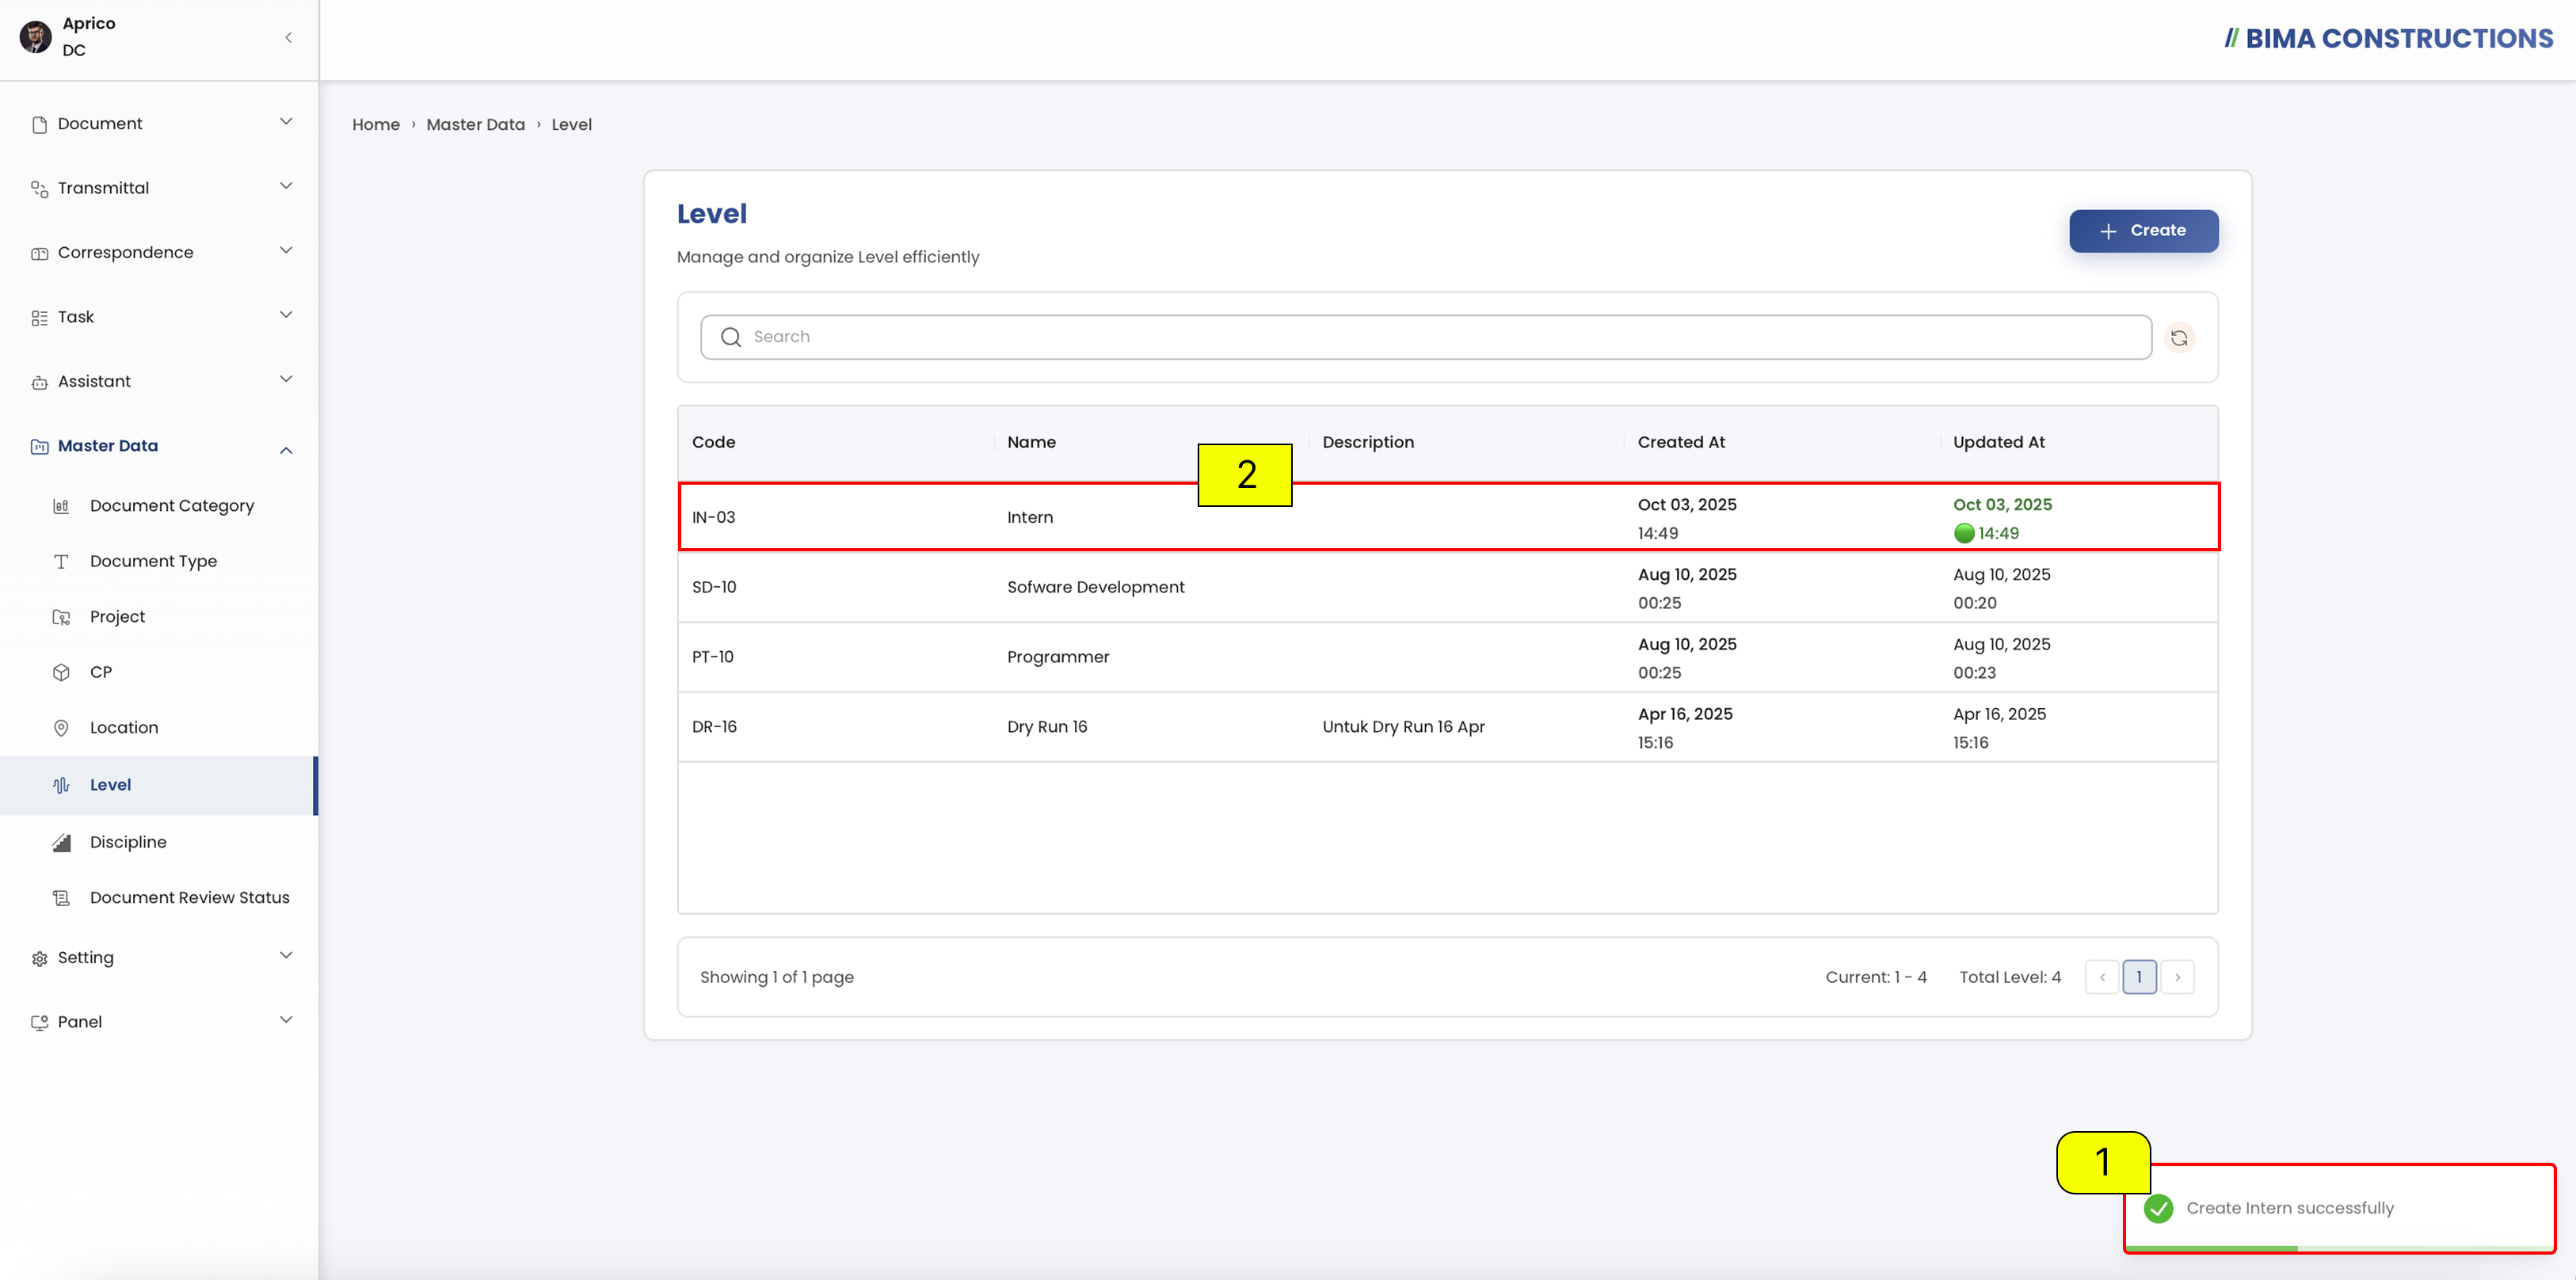
- After creating a new Location, a notification will appear at the bottom right corner with the message
Create [Level Name] Successfullyas confirmation that the Location has been created.- The newly created Location will also automatically appear in the CP list with details such as code, name, description, created at, and updated at.
Discipline
The Discipline menu is used to manage and organize disciplines efficiently.
Create Discipline
Open Discipline
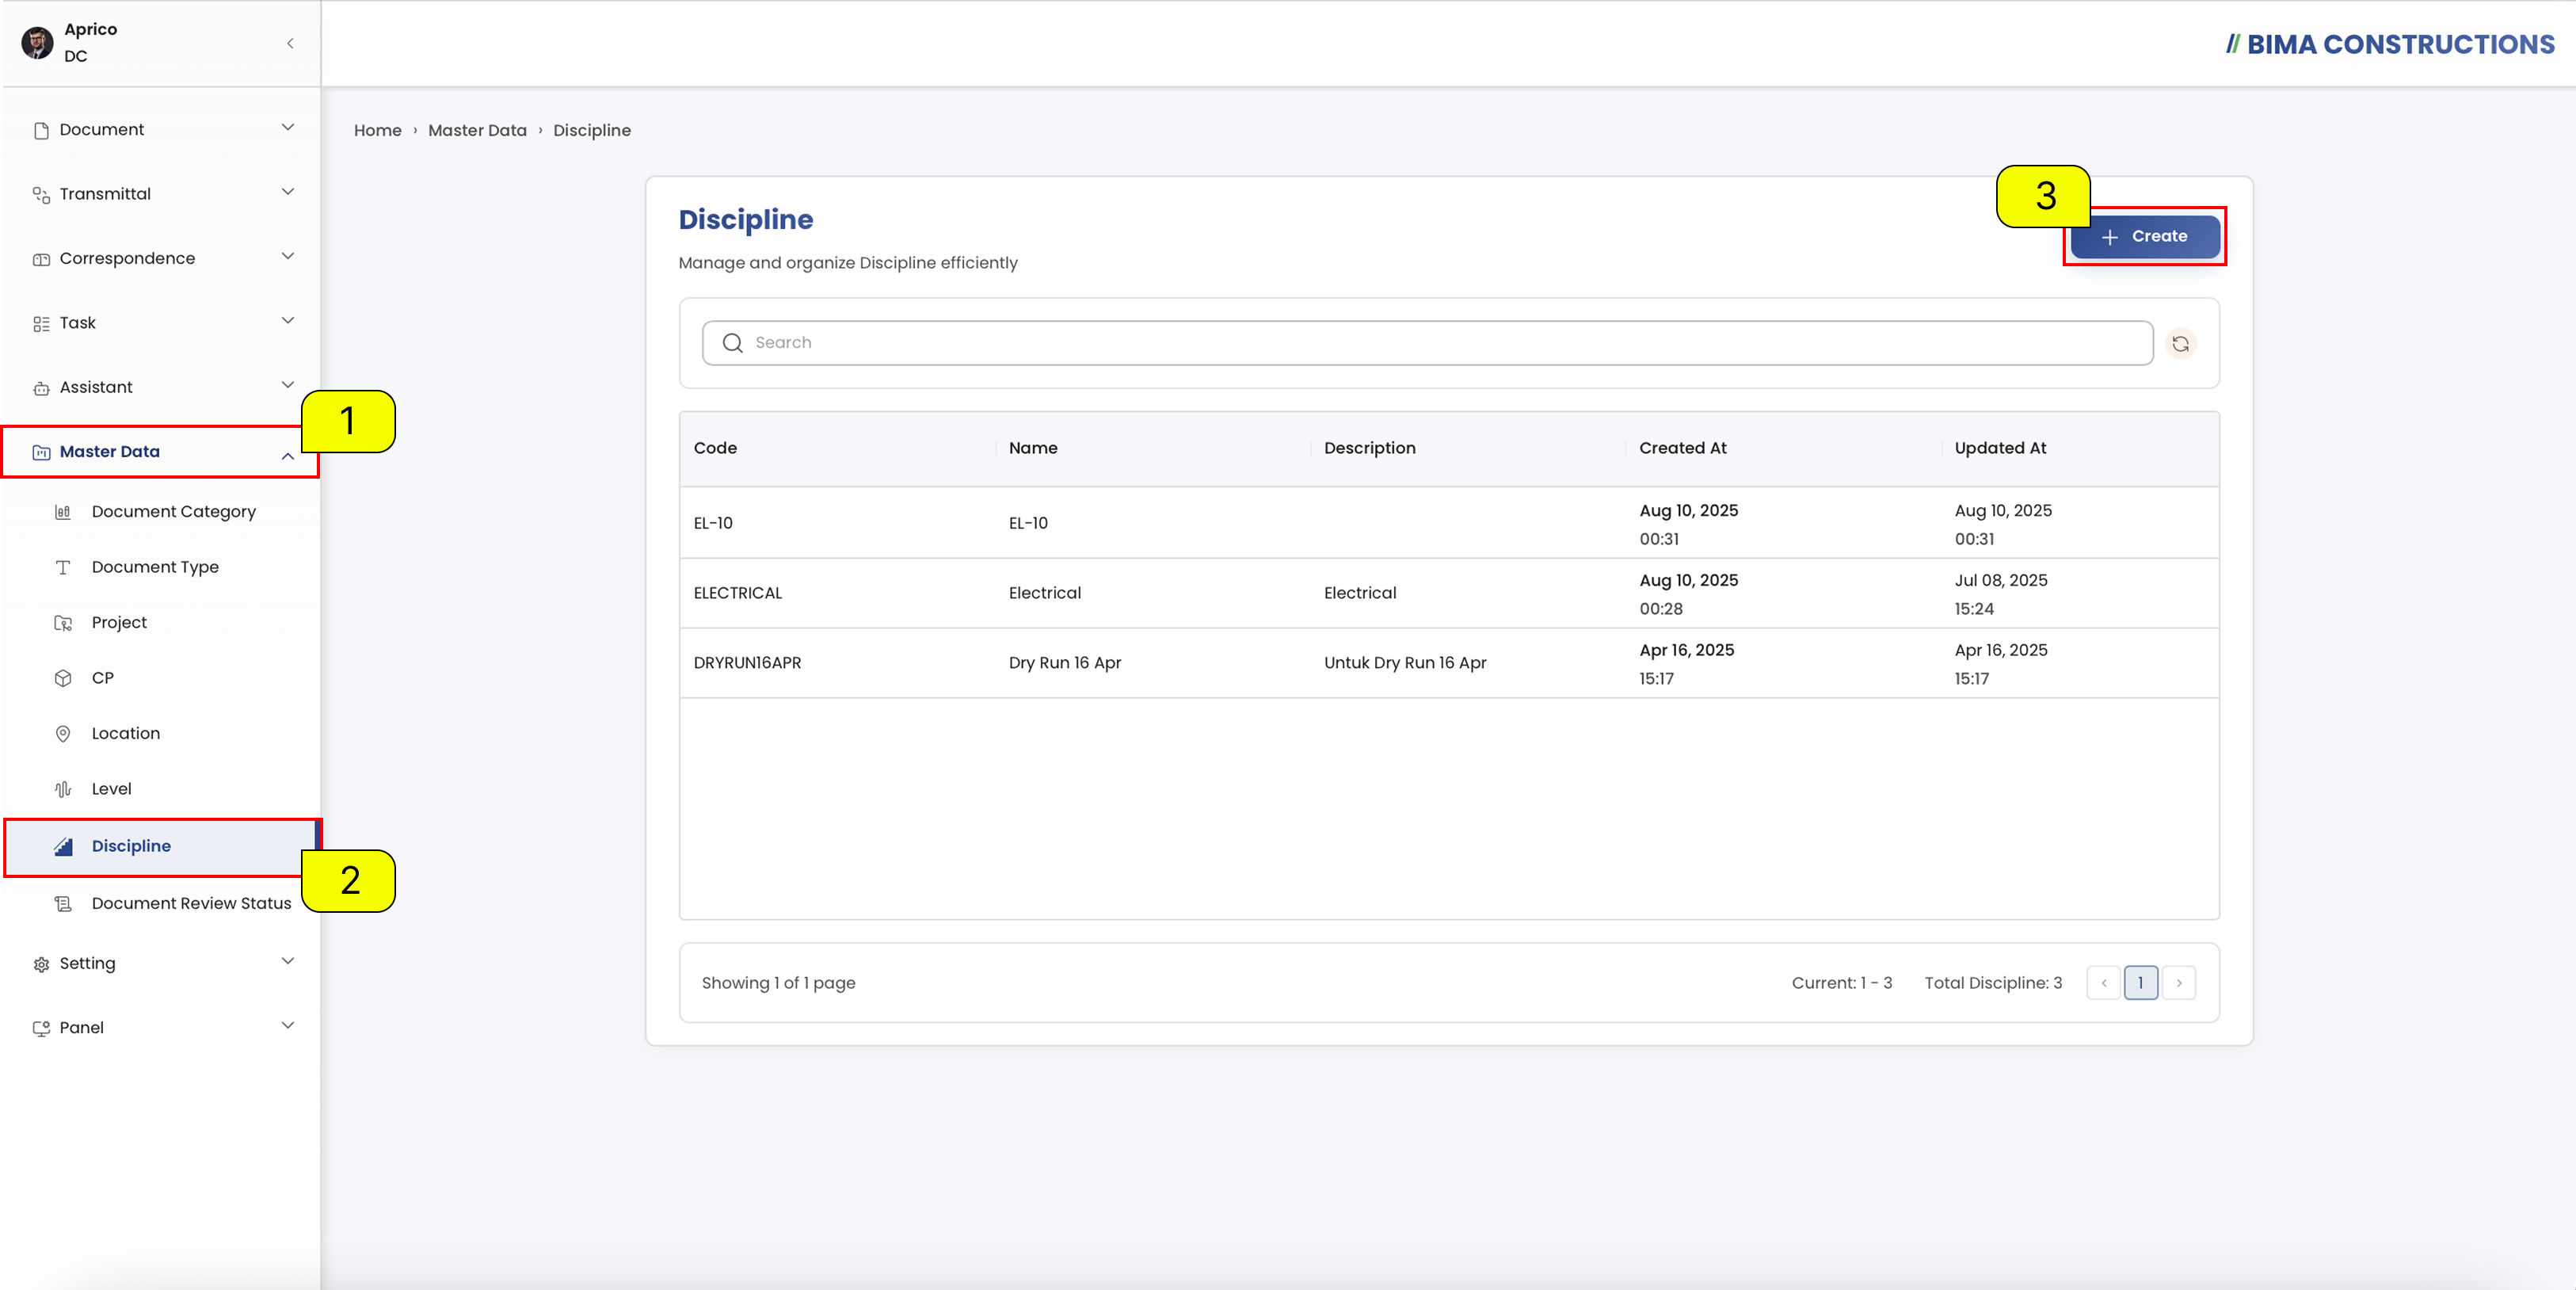
- The Document Controller can click on the
Master Datamenu button to expand its submenu.- The Document Controller can select the
Disciplinemenu to view all existing Discipline.- The Document Controller can click on the
Createbutton to add a new Discipline.Fill Discipline Form
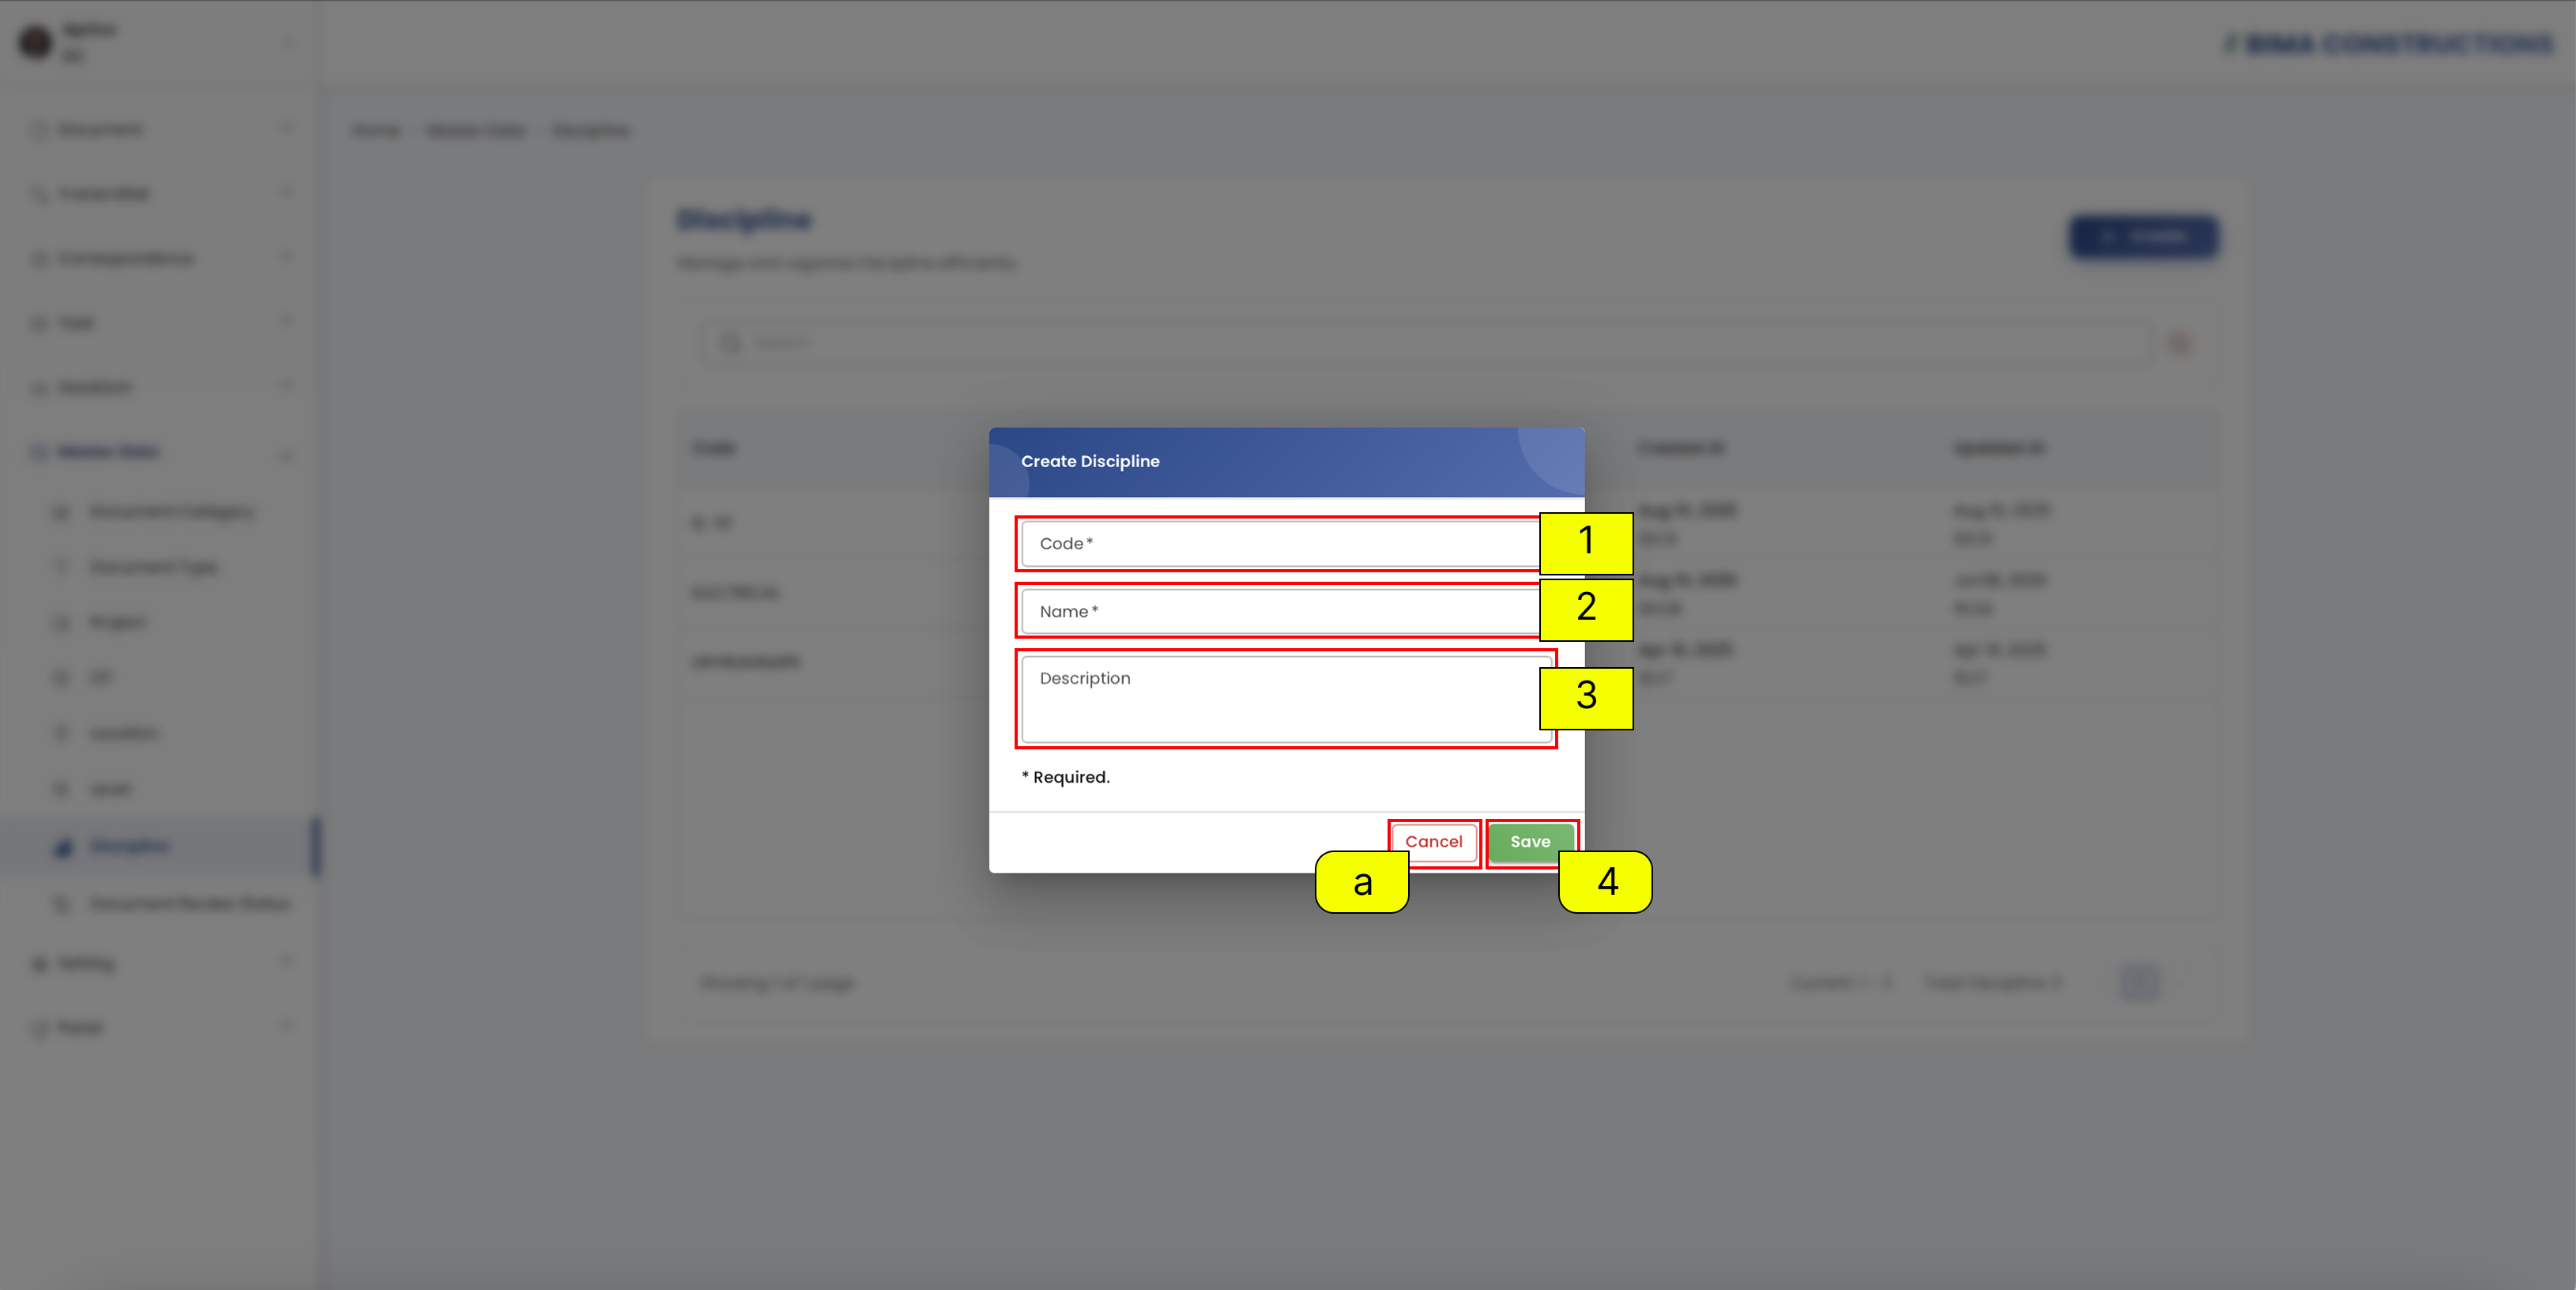
- The Document Controller can fill the
Codefield with a unique identifier for the level.- The Document Controller can fill the
Namefield for the level.- The Document Controller can fill the
Descriptionfield for additional details (optional).- After filling in the fields, the Document Controller can click the
Savebutton to create the new level orCancelto discard the action.Successfully & Check Discipline
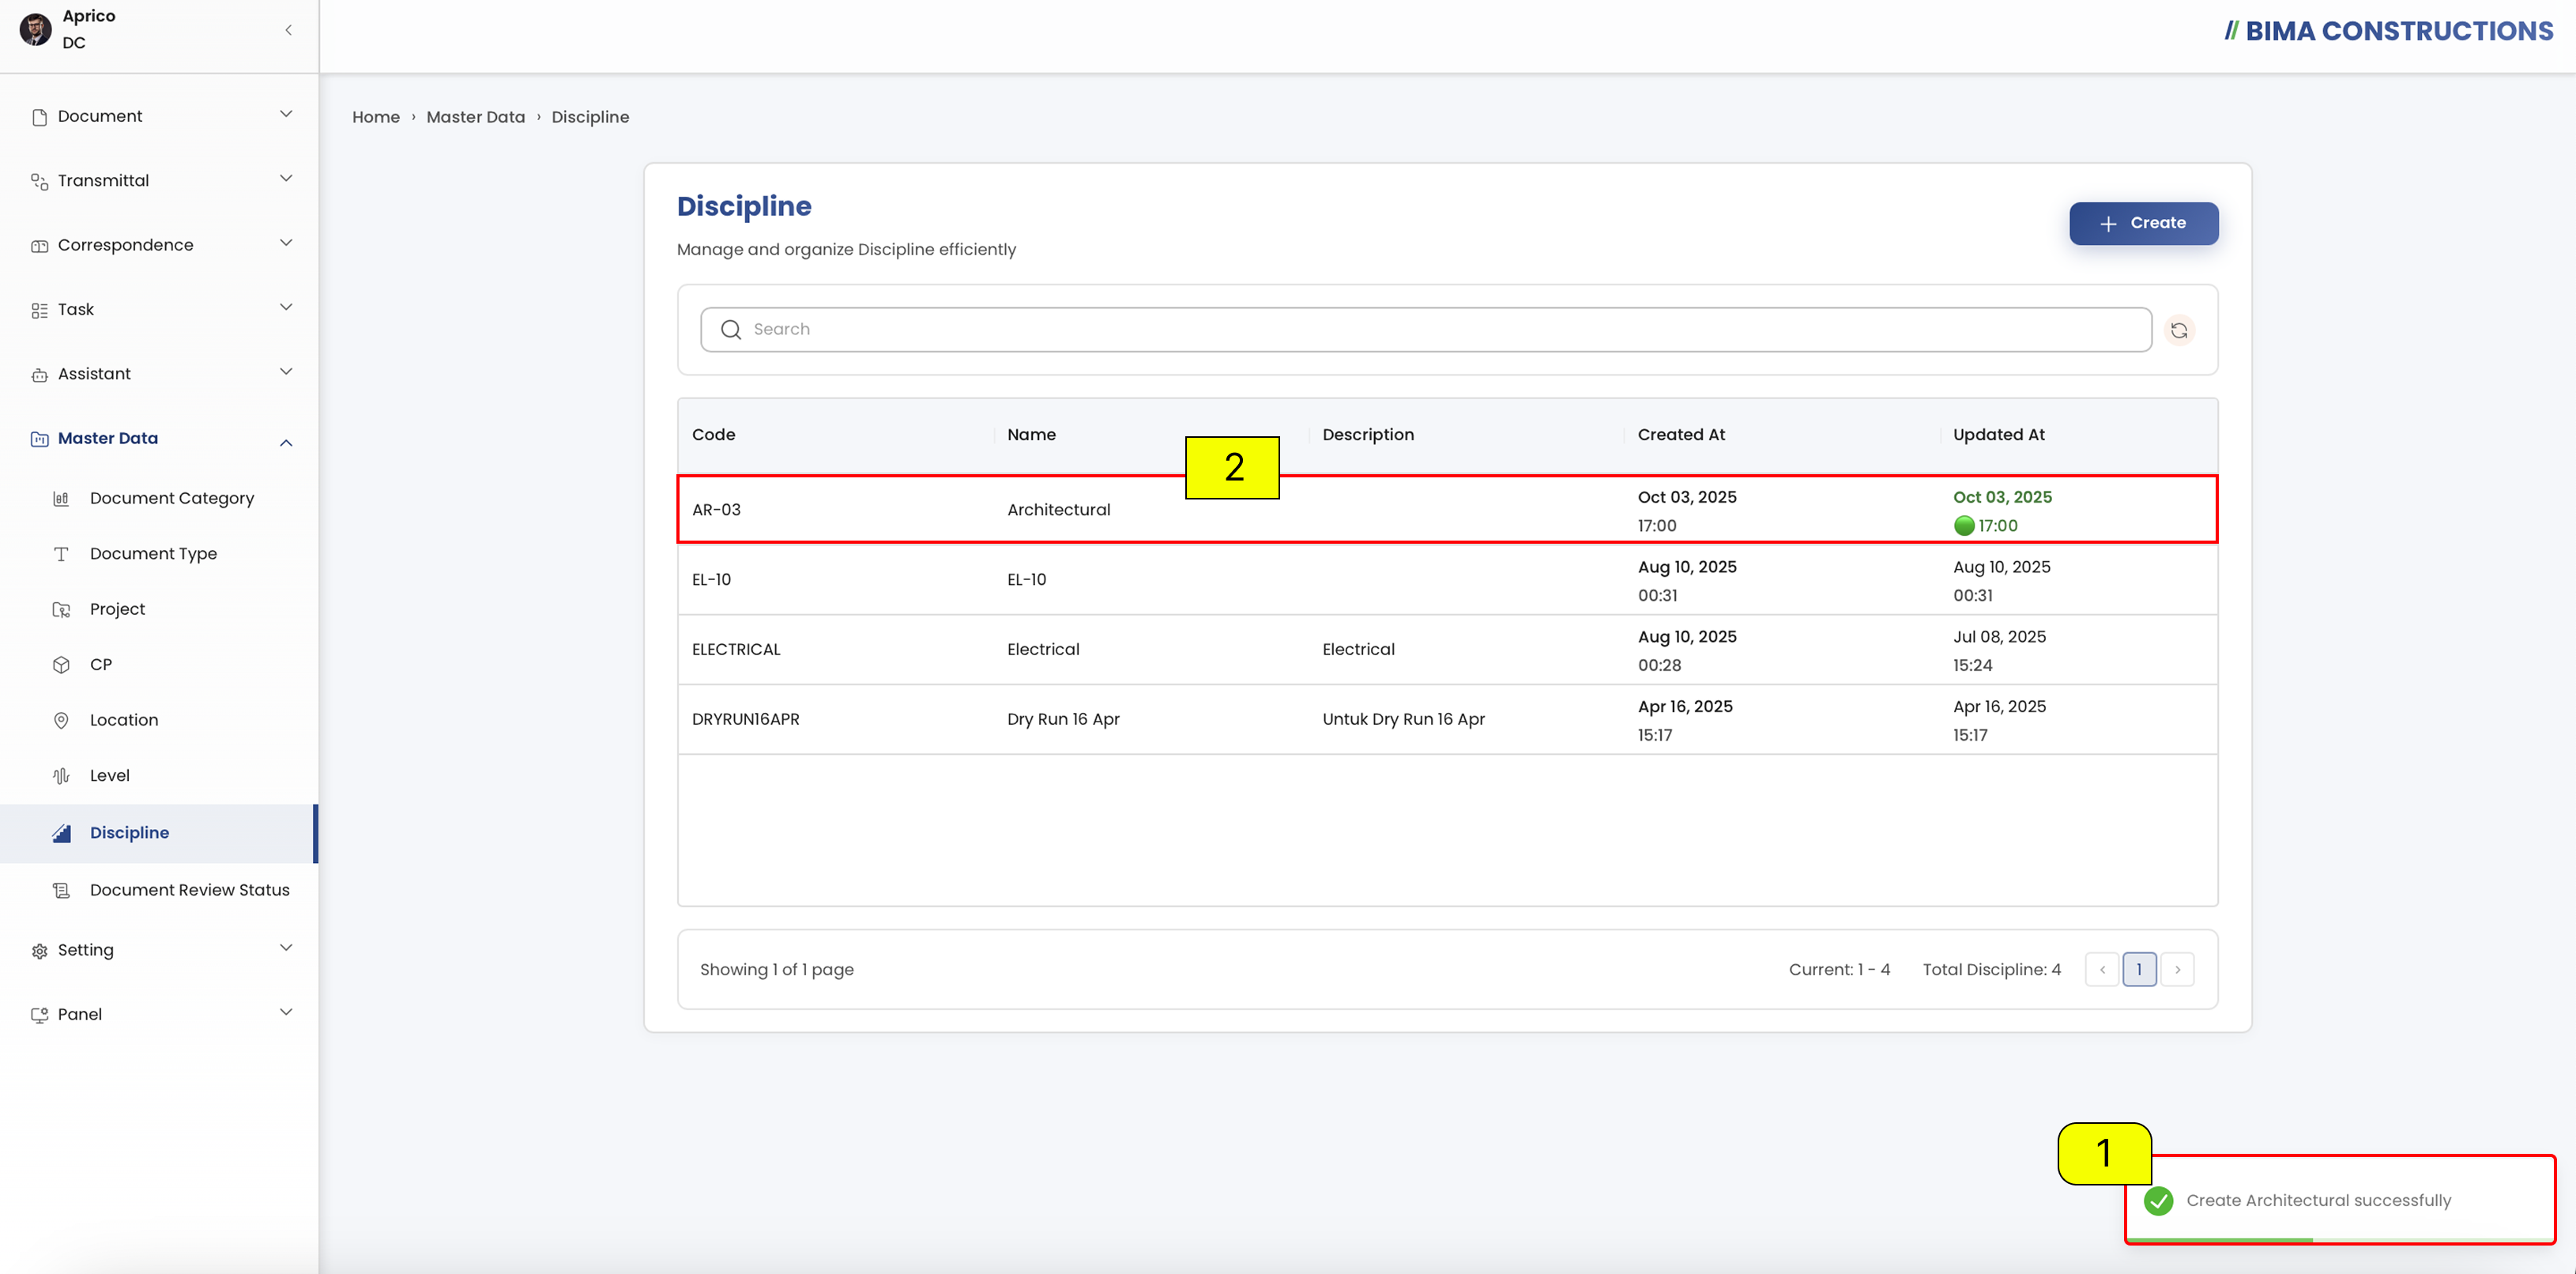
- After creating a new Discipline, a notification will appear at the bottom right corner with the message
Create [Discipline Name] Successfullyas confirmation that the Discipline has been created.- The newly created Discipline will also automatically appear in the CP list with details such as code, name, description, created at, and updated at.
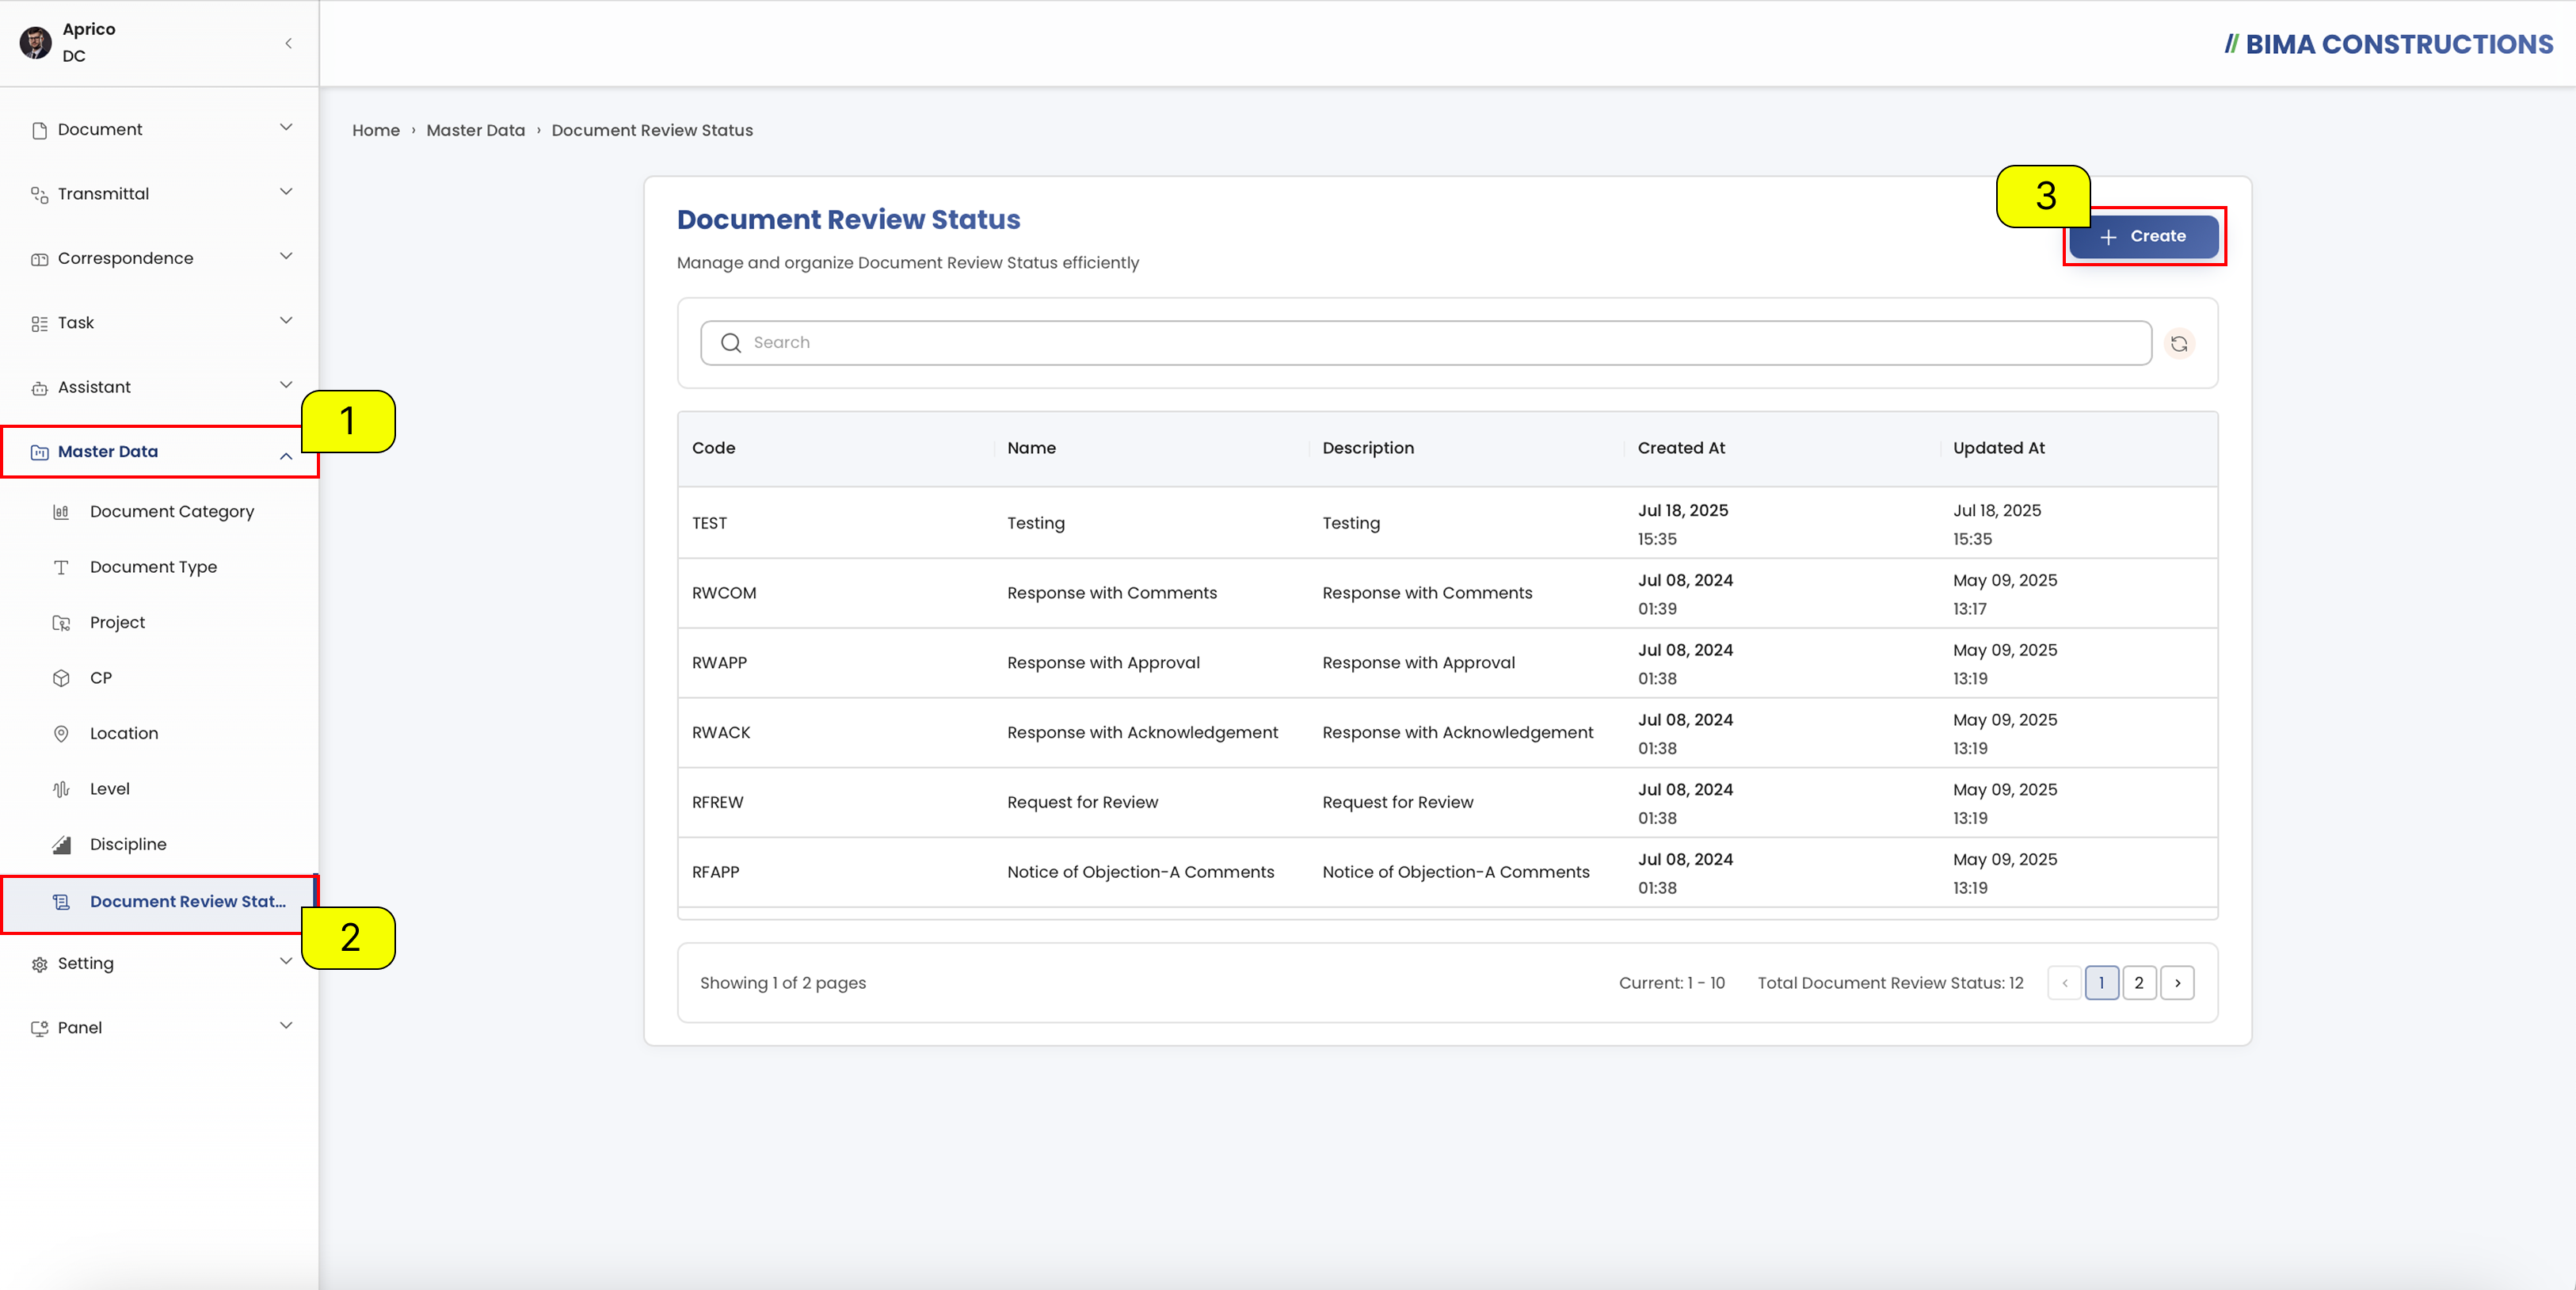
Document Review Status
The Document Review Status menu is used to manage and organize Document Review Status efficiently.
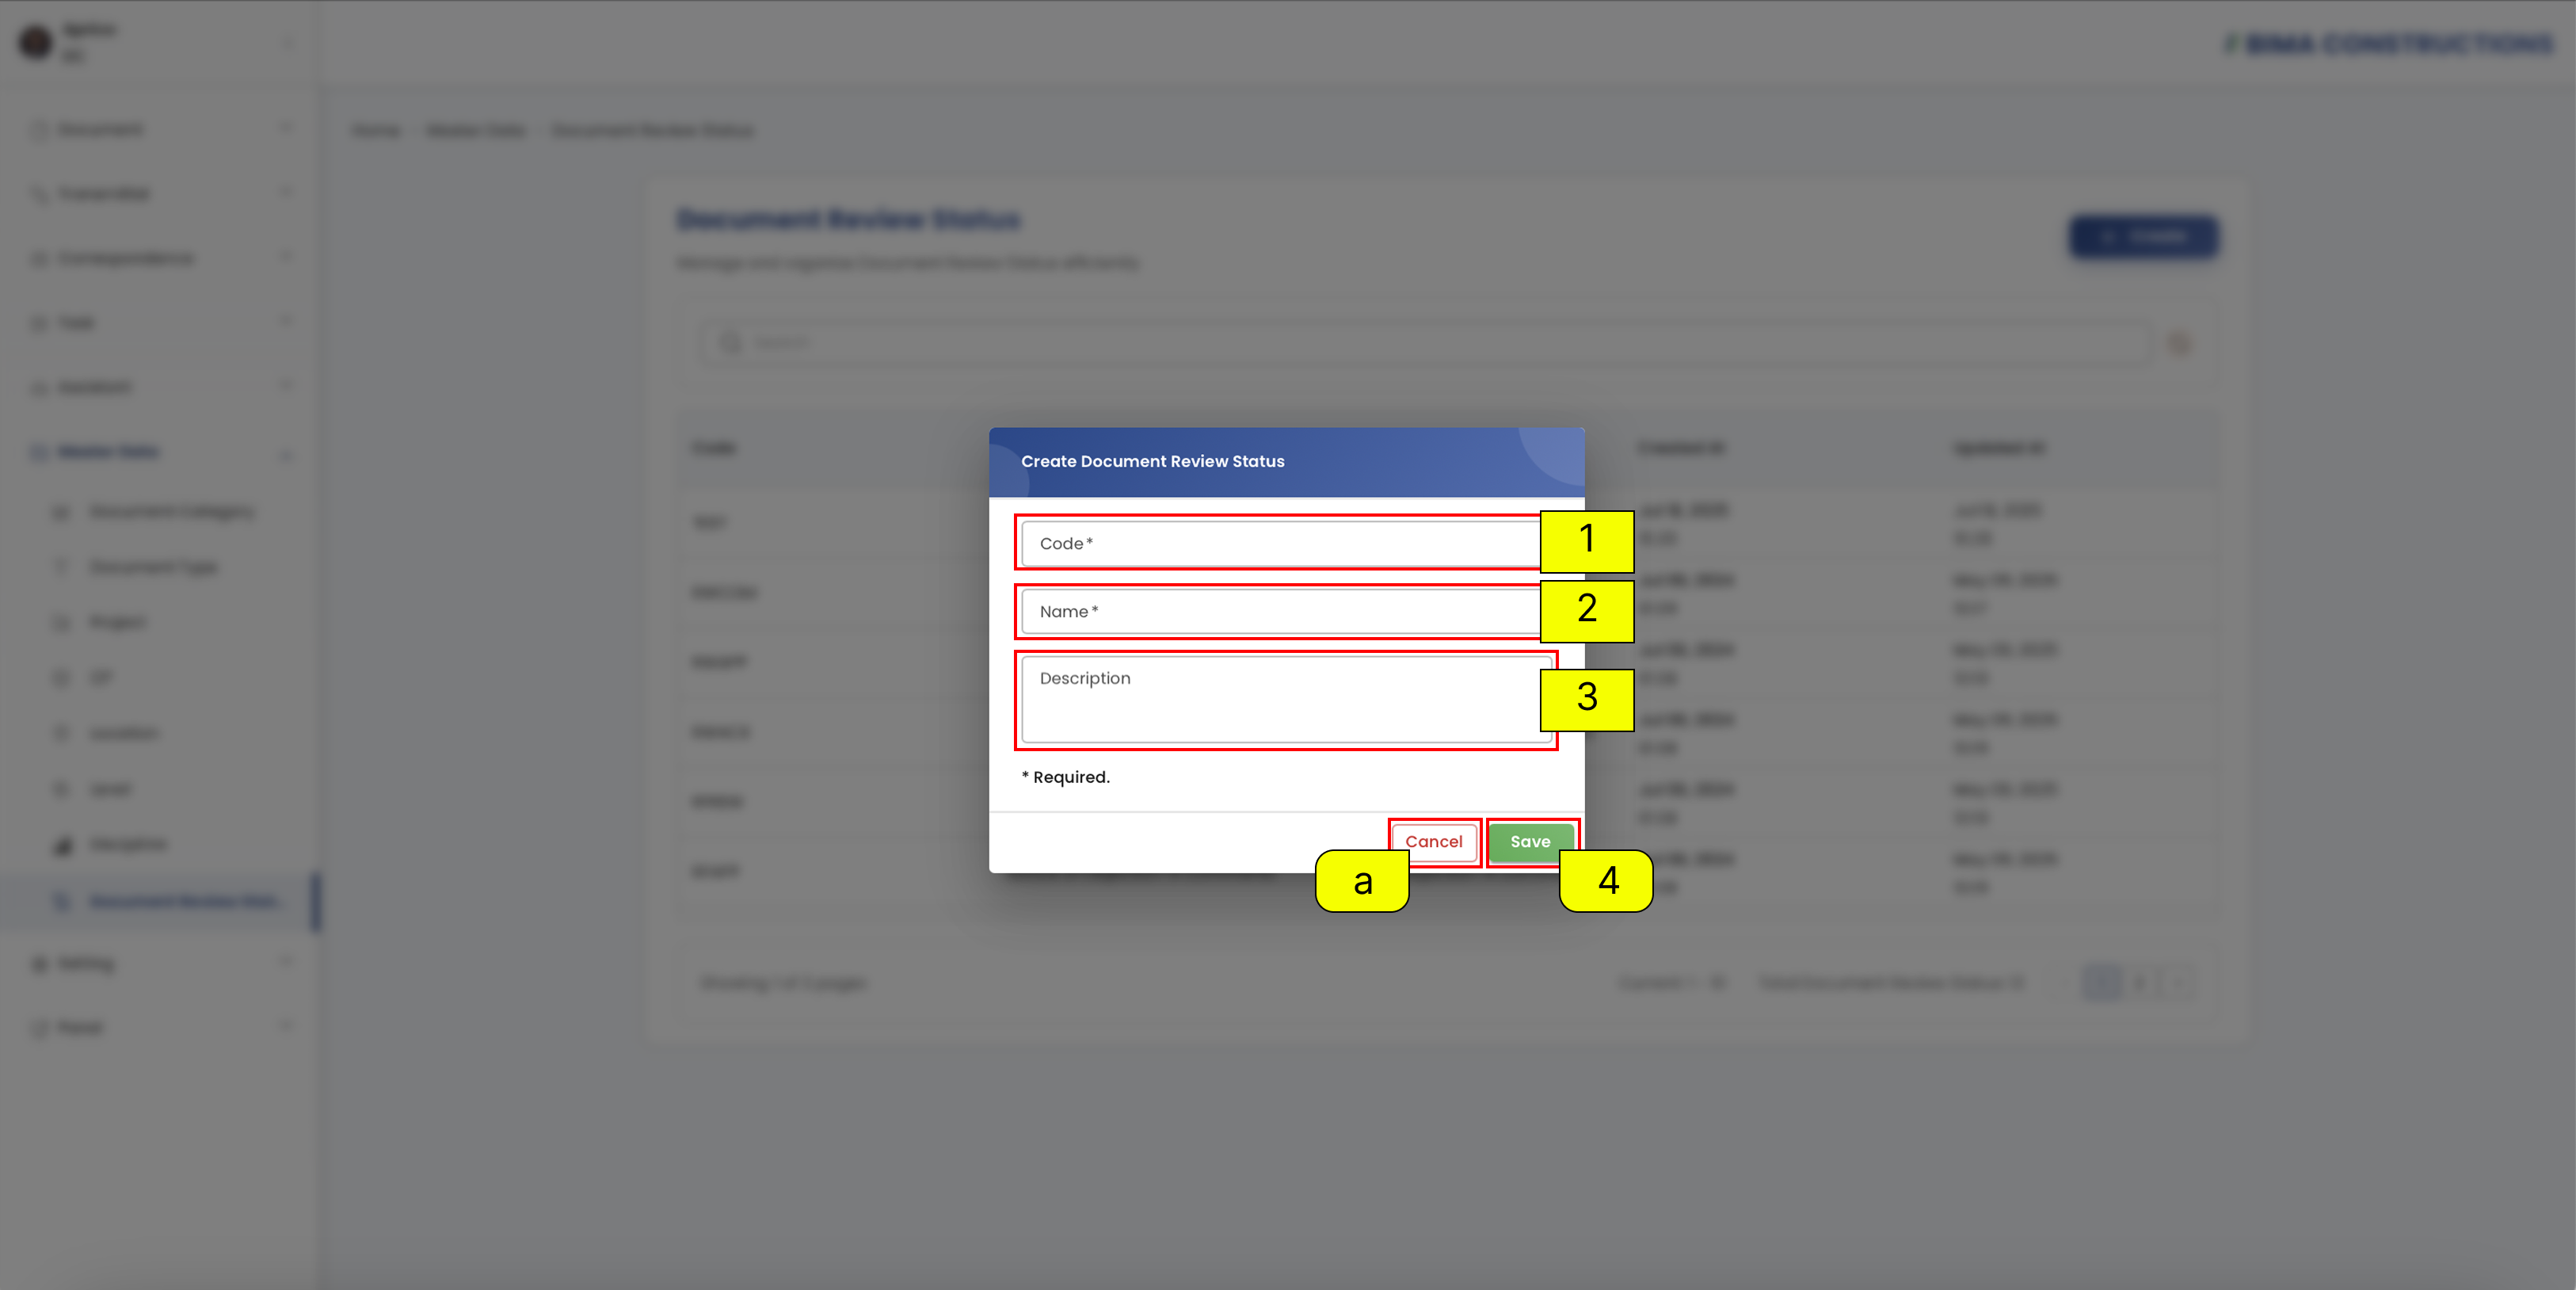
Create Document Review Status
Open Document Review Status
- The Document Controller can click on the
Master Datamenu button to expand its submenu.- The Document Controller can select the
Document Review Statusmenu to view all existing Document Review Status.- The Document Controller can click on the
Createbutton to add a new Document Review Status.Fill Document Review Status Form
- The Document Controller can fill the
Codefield with a unique identifier for the level.- The Document Controller can fill the
Namefield for the level.- The Document Controller can fill the
Descriptionfield for additional details (optional).- After filling in the fields, the Document Controller can click the
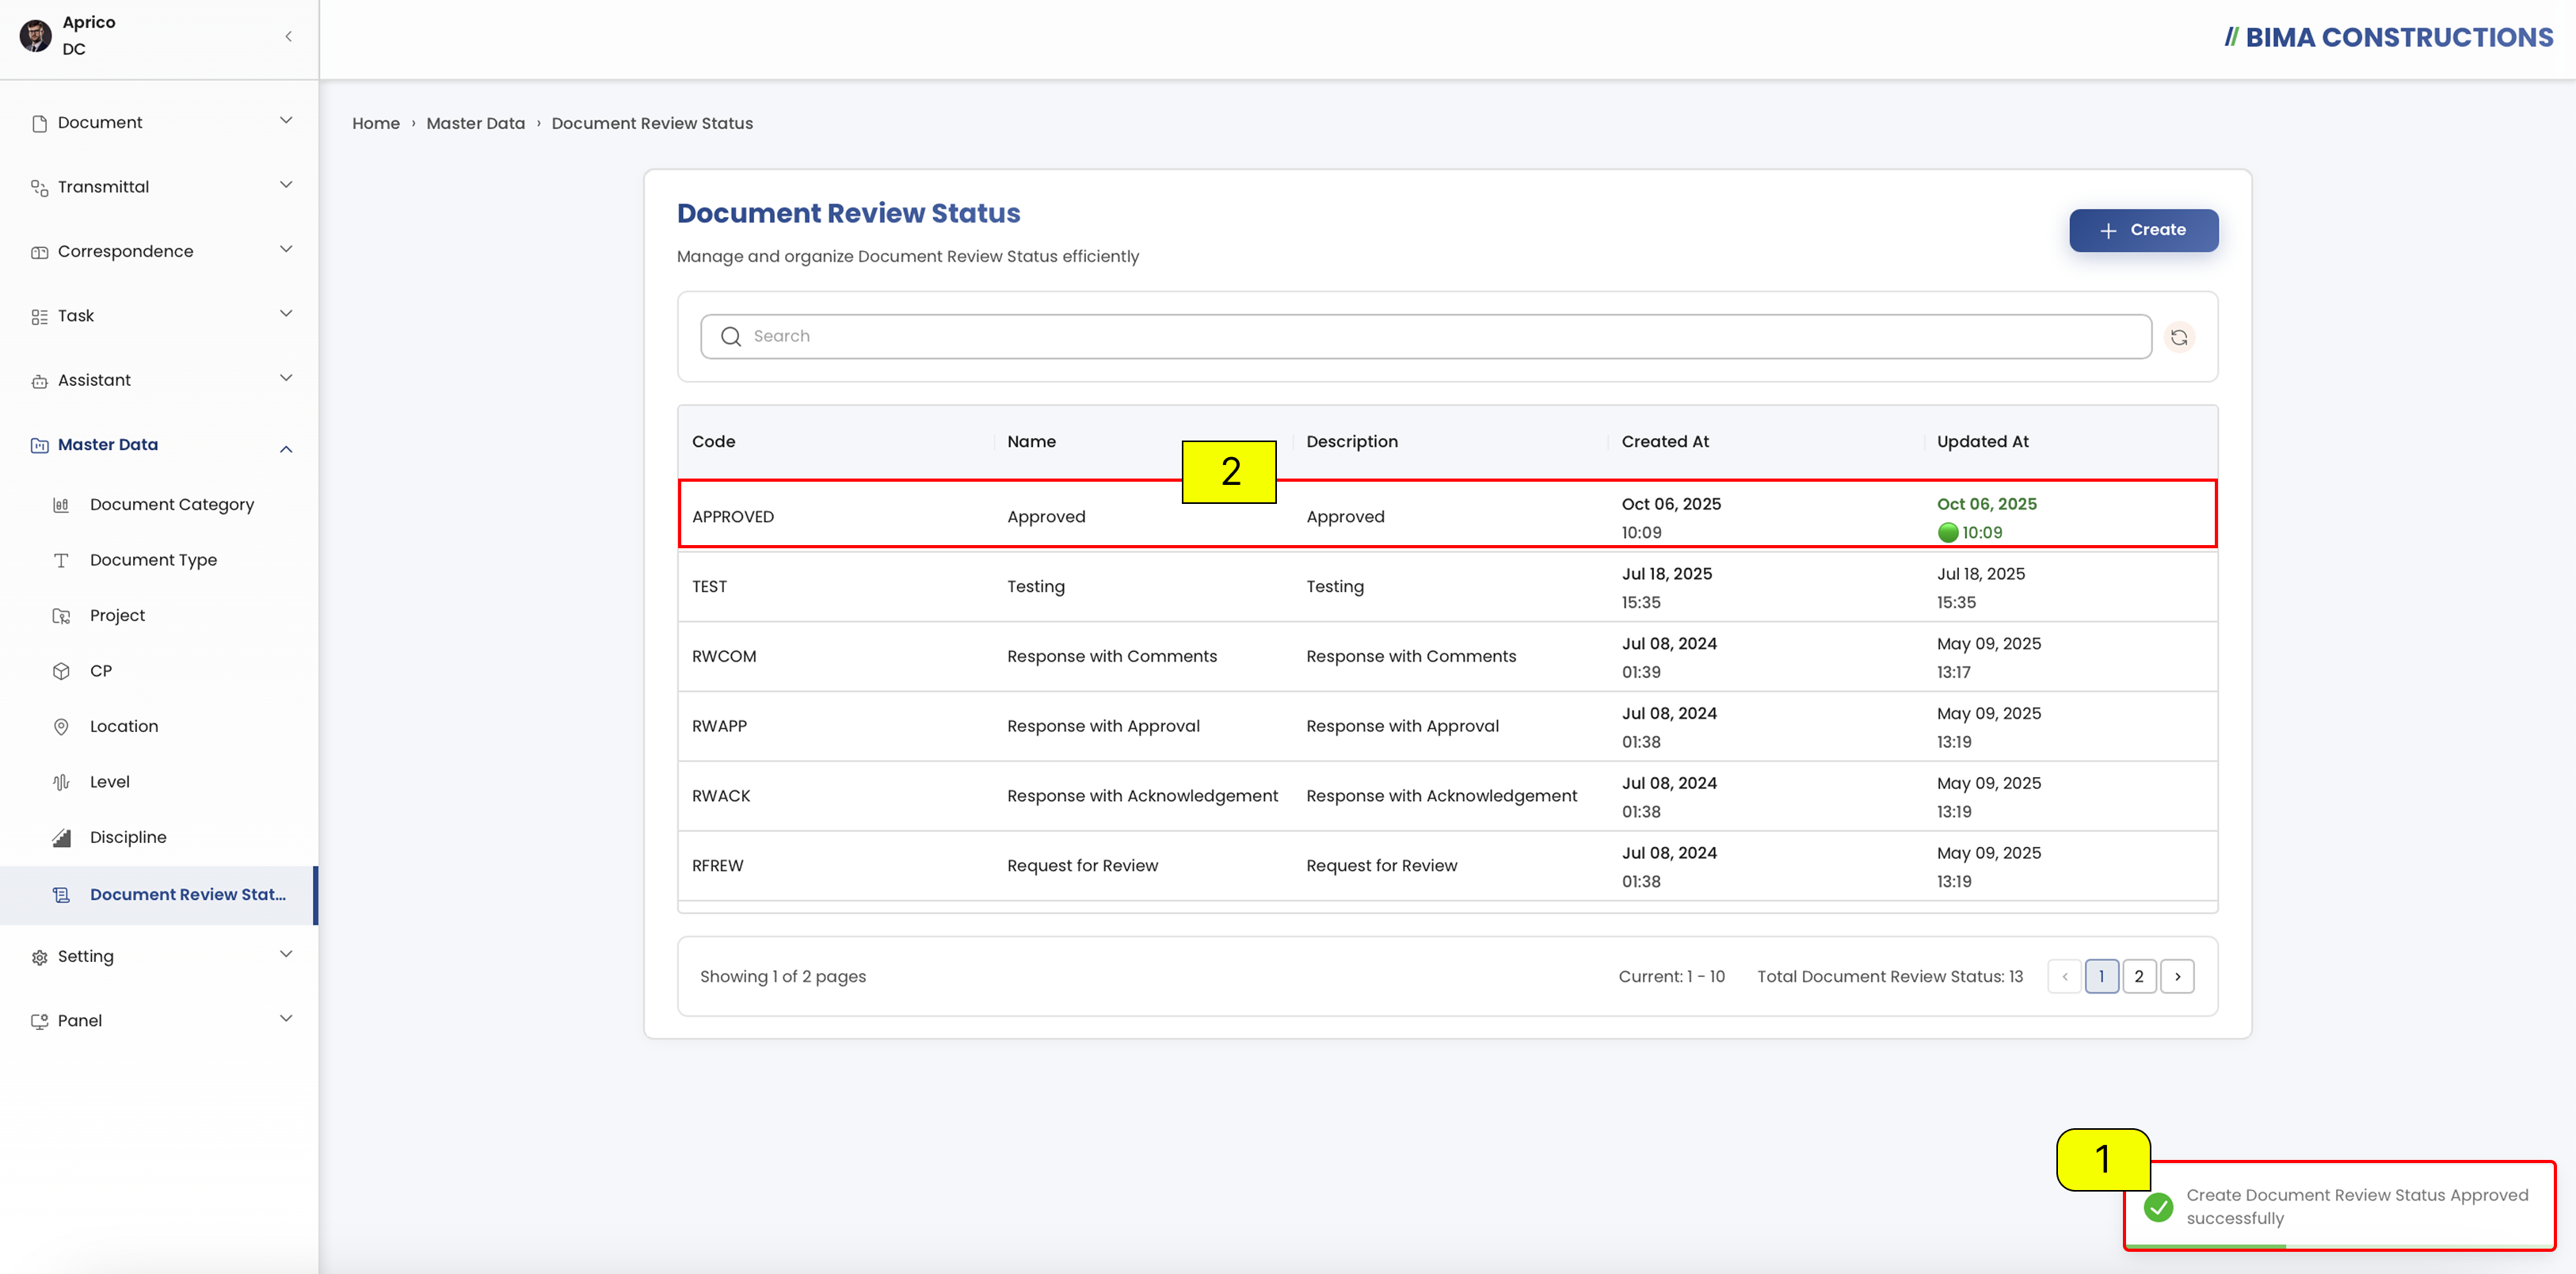
Savebutton to create the new level orCancelto discard the action.Successfully & Check Document Review Status
- After creating a new Document Review Status, a notification will appear at the bottom right corner with the message
Create [Document Review Status Name] Successfullyas confirmation that the Document Review Status has been created.- The newly created Document Review Status will also automatically appear in the CP list with details such as code, name, description, created at, and updated at.